
Operator는 Publisher가 내보내는 value에 대해 작업을 수행하는 메서드입니다.
각 Combine Operator는 Publisher를 반환합니다.
보통 Operator들은 Upstream의 이벤트를 받아서 이를 조작한 뒤, 조작된 이벤트를 소비할 Downstream으로 보냅니다.
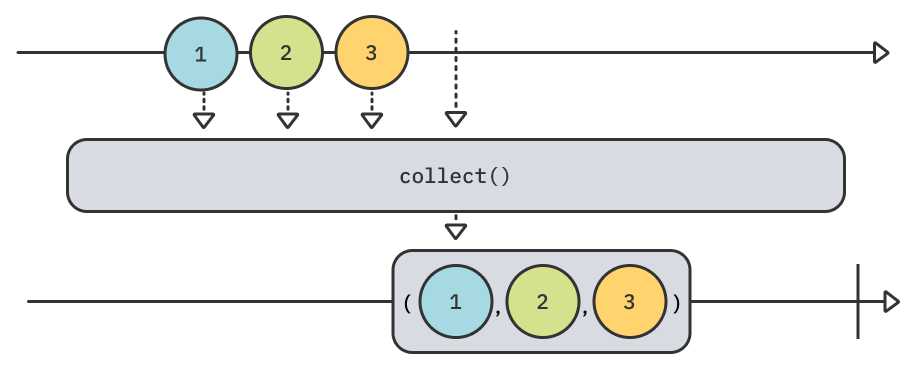
collect()
( = RxSwift의 toArray())
collect() operator는 여러개의 value 시퀀스를 하나의 배열 결과값으로 변환해줍니다.
아래는 collect() operator를 나타내는 마블다이어그램입니다.
마블다이어그램에 대한 설명은 RxSwift의 그것과 동일하기 때문에 지난글([RxSwift] Lifecycle과 마블다이어그램)로 대체합니다.
아래는 collect()의 예시입니다.
collect()를 적용하기 전이기 때문에 각각의 value들이 시퀀스로 하나씩 방출됩니다.
var subscriptions = Set<AnyCancellable>()

["A", "B", "C", "D", "E"].publisher
    .sink(receiveCompletion: { print($0) },
          receiveValue: { print($0) })
.store(in: &subscriptions)// 출력
A
B
C
D
E
finished
.sink() 위에 collect() operator를 추가해봅니다.
var subscriptions = Set<AnyCancellable>()

["A", "B", "C", "D", "E"].publisher
    .collect() // 추가
    .sink(receiveCompletion: { print($0) },
          receiveValue: { print($0) })
.store(in: &subscriptions)시퀀스 value들이 하나의 배열로 방출되는 것을 확인할 수 있습니다.
// 출력
["A", "B", "C", "D", "E"]
finished⚠️ collect() operator는 Upstream의 Publisher가 finished되었을 때 value들을 배열로 모아서 방출시켜줍니다.
위 예시는 유한한 값을 가지는 시퀀스이기 때문에 바로 finished되어 배열이 방출되었지만,
갯수가 지정되지 않은 Publisher에서 collect()를 사용할 때는 finished되기 전까지 해당 메모리를 계속 사용하고 값을 Downstream으로 전달시켜주지 않기 때문에 주의해야 합니다.
collect() operator는 아래처럼 몇개씩 묶어줄지 지정해 줄 수 있습니다.
var subscriptions = Set<AnyCancellable>()

["A", "B", "C", "D", "E"].publisher
    .collect(2) // 2개씩 묶도록 지정
    .sink(receiveCompletion: { print($0) },
          receiveValue: { print($0) })
.store(in: &subscriptions)지정해준 갯수만큼 버퍼를 채우지 않아도 finished되면 채워진 만큼만 배열을 방출시켜줍니다.
// 출력
["A", "B"]
["C", "D"]
["E"]
finished
map(_:)
( = RxSwift의 map(_:))
Swift Foundation의 map(_:)과 동일한 기능의 operator입니다.
Upstream에서 받은 각각의 value를 다른 value로 매핑시켜 Downstream으로 전달시키는 operator입니다.
위의 collect()와는 달리 하나의 value를 받는 즉시 매핑시켜 전달합니다.
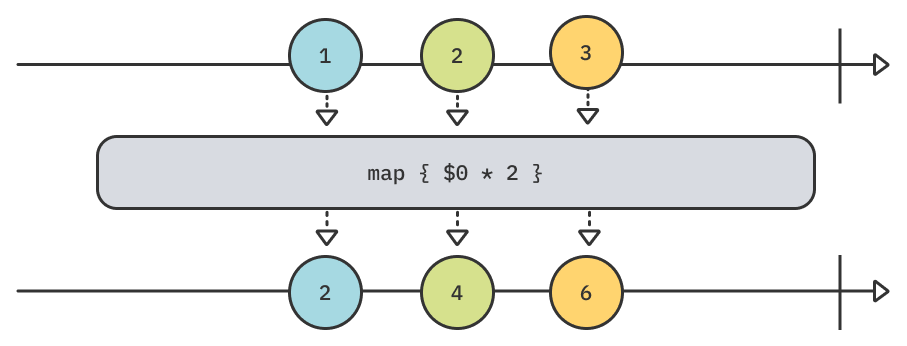
아래는 map(_:) operator의 예시입니다.
// 1. 각 숫자의 spell을 입력할 formatter를 생성
let formatter = NumberFormatter()
formatter.numberStyle = .spellOut

// 2. Int Publisher를 생성
[123, 4, 56].publisher
    .map { // 3. map(_:)으로 'Upstream 값을 가져와 formatter로 문자열로 변환한 값을 반환하는 클로저'를 전달
        formatter.string(for: NSNumber(integerLiteral: $0)) ?? ""
    }
    .sink(receiveValue: { print($0) })
.store(in: &subscriptions)// 출력
one hundred twenty-three
four
fifty-six
Map(_:) with KeyPaths
map(_:) operator에서 파생된
map<T>(_:), map<T0, T1>(_:_:), map<T0, T1, T2>(_:_:_:) 시리즈가 있습니다.
Upstream으로부터 받은 객체의 프로퍼티들을 키패스를 사용해 최대 3개까지 매핑시킬 수 있습니다.
아래는 Upstream으로부터 받은 Coordinate 객체의 x, y 프로퍼티를 키패스로 매핑시켜 Downstream으로 전달시키는 예제입니다.
// 1. Coordinate, Never 타입의 PassthroughSubject를 생성
let publisher = PassthroughSubject<Coordinate, Never>()

// 2. publisher의 subscription 생성
publisher
    .map(\.x, \.y) // 3. 키패스로 Coordinate의 x, y 프로퍼티에 매핑
    .sink(receiveValue: { x, y in
        print( // 4. map으로부터 전달받은 x, y를 처리
            "The coordinate at (\(x), \(y)) is in quadrant",
            quadrantOf(x: x, y: y)
        )
    })
    .store(in: &subscriptions)

// 5. subject를 통해 Coordinate들을 전달
publisher.send(Coordinate(x: 10, y: -8))
publisher.send(Coordinate(x: 0, y: 5))// 출력
The coordinate at (10, -8) is in quadrant 4
The coordinate at (0, 5) is in quadrant boundary
tryMap(_:)
Combine에서 제공하는 operator들은 tryMap(_:) 뿐만 아니라 try prefix를 가진 operator들을 제공합니다.
(tryMap, tryMerge, tryReduce, tryScan, tryDrop)
try operator의 클로저에서 error를 throw하면, Downstream으로 error를 방출합니다.
아래는 tryMap(_:)의 예시입니다.
// 1. 존재하지 않는 디렉터리명을 내보내는 Just
Just("DirectoryNameNotExist")
    .tryMap { // 2. 해당 디렉터리 내용을 가져오기 위해 try
        try FileManager.default.contentsOfDirectory(atPath: $0)
    }
    .sink(receiveCompletion: { print("completion: \($0)") }, // 3. 이벤트를 수신
          receiveValue: { print("value: \($0)") })
.store(in: &subscriptions)// 출력
completion: failure(Error Domain=NSCocoaErrorDomain Code=260 "The folder “DirectoryNameNotExist” doesn’t exist."
UserInfo={NSUserStringVariant=(Folder), NSFilePath=DirectoryNameNotExist, NSUnderlyingError=0x600003c40510
{Error Domain=NSPOSIXErrorDomain Code=2 "No such file or directory"}})flatMap(maxPublisher:_:)
( = RxSwift의 merge(maxConcurrent:))
flatMap operator는 여러 Upstream Publisher를 하나의 Downstream Publisher로 flat하게 만들어줍니다.
혹은 Upstream Publisher에서 내보낸 값들을 flat하게 만들어줍니다.
Upstream의 Publisher가 내보내는 값을 받아서, 또 다른 Publisher를 내보내는 메서드에게 전달하는 중간역할로 flatMap이 사용됩니다. 아래는 해당 역할의 flatMap의 예시입니다.
// 1. 각 ASCII 코드를 나타내는 Int배열을 받아서,
// Error를 내보내지 않는 String 타입의 Type-erase된 Publisher를 반환하는 함수
func decode(_ codes: [Int]) -> AnyPublisher<String, Never> {
    // 2. 32~255범위의 code를 받아서 ASCII 문자를 반환하는 Just
    Just(
        codes
            .compactMap { code in
                guard (32...255).contains(code) else { return nil }
                return String(UnicodeScalar(code) ?? " ")
            }
            .joined() // 3. 문자열로 Join
    )
    .eraseToAnyPublisher() // 4. AnyPublisher로 반환하기 위한 type-erase
}

// 5.ASCII 문자 배열을 Publisher로 변환
[72, 101, 108, 108, 111, 44, 32, 87, 111, 114, 108, 100, 33]
    .publisher
    .collect()
    .flatMap(decode) // 6. flatMap으로 배열 요소들을 단일 배열로 모아서 decode(_:)로 전달
    .sink(receiveValue: { print($0) }) // 7. decode(_:)로 반환된 Publisher를 sink
.store(in: &subscriptions)출력
Hello, World!⚠️ collect() operator와 마찬가지로, Upstream의 Output을 모두 모아서 flat하게 만들어 Downstream으로 전달하기 때문에 Output갯수가 정해지지 않은 시퀀스를 flatMap으로 전환시 시퀀스가 끝나기 전까지 Downstream으로 값을 전달하지 않고 메모리 문제를 일으킬 수 있으니 주의해야합니다.
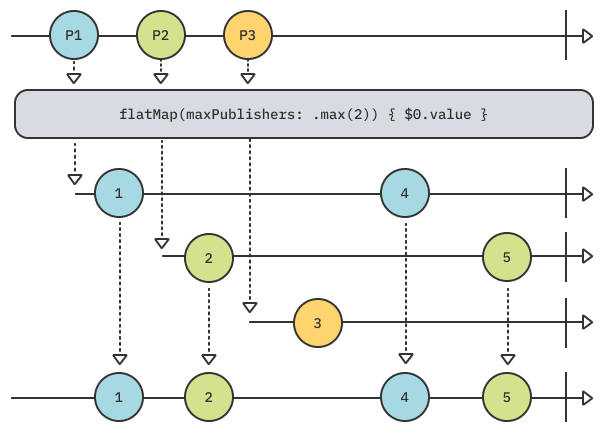
위 마블다이어그램에서 flatMap은 3개의 Publisher를 받아 각각이 방출하는 값들을 하나의 시퀀스로 flat하게 만들어줍니다.
maxPublishers가 .max(2)로 설정되어 최대 2개의 Publisher로부터만 값을 받아 3번째 Publisher에게 받은 Output은 무시됩니다.
replaceNil(with:)
Output이 Optional값인 Upstream에서 전달받은 nil Output을 지정한 값으로 바꿔주는 operator입니다.
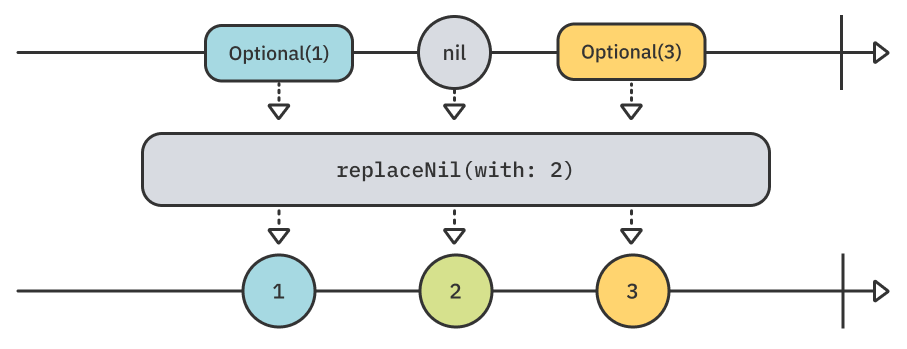
아래는 [String?]을 Publisher로 만들고, 전달받은 nil값을 replaceNil(with:)를 이용해 -로 변환시키는 예시입니다.
// 1. [String?] 을 Publisher로 만듦
["A", nil, "C"].publisher
    .eraseToAnyPublisher() // ✨
    .replaceNil(with: "-") // 2. nil 값을 -로 변환
    .sink(receiveValue: { print($0) }) // 3. sink로 subscribe
.store(in: &subscriptions)출력을 보면 nil이 -로 잘 변환된 것을 확인할 수 있습니다.
// 출력
A
-
C✨ replaceNil(with:)는 nil을 non-nil값으로 대체시켜주기 때문에 당연히 Output이 non-Optional로 나와야할 거 같은데, 위 예시에서 .eraseToAnyPublisher()를 제거했을 때, Output이 Optional<String>으로 나오는 것을 볼 수 있습니다(공식 문서에서도 Optional로 나오는 것으로 설명. why??). Upstream에서 .eraseToAnyPublisher()를 사용하면 non-Optional 값으로 Output이 나오도록 할 수 있습니다.
replaceEmpty(with:)
( = RxSwift의 ifEmpty(default:))
Publisher에서 값을 내보내지않고 complete이 될 수가 있습니다. 이런 경우 replaceEmpty(with:) operator를 사용해서 complete 전에 특정값을 내보내도록 일종의 기본값을 설정해 줄 수 있습니다.
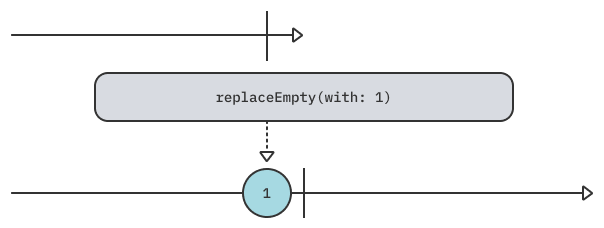
아래는 subscribe하자마자 complete을 내보내는 Empty Publisher의 예시입니다.
// 1. complete을 바로 내보내는 Empty Publisher
let empty = Empty<Int, Never>()

// 2. subscribe
empty
    .replaceEmpty(with: 1) // complete 전에 1을 내보내도록
    .sink(receiveCompletion: { print($0) },
          receiveValue: { print($0) })
.store(in: &subscriptions)sink 이전에 replaceEmpty(with:)를 사용하면 complete 전에 해당 값을 전달해주는 것이 확인됩니다.
// 출력
1
finished
scan(_:_:)
( = RxSwift의 scan(_:accumulator:))
Swift Foundation의 reduce(_:_:)과 유사한 기능의 operator입니다.
Upstream의 클로저에서 내보내는 현재값과 scan 클로저의 초기값 혹은 마지막 값을 제공해줍니다.
reduce와의 차이점은 모든 처리를 다 한 뒤에 최종값만 방출하는 것이 아니라, 매 reduce과정마다 값을 방출한다는 점입니다.
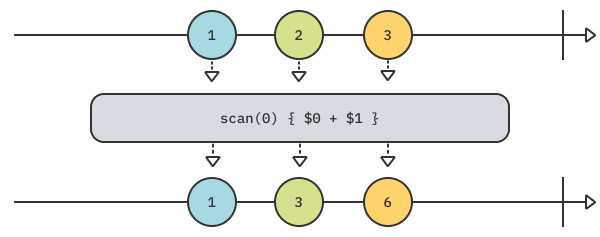
위 마블다이어그램에서는 초기값0부터 저장해서 Upstream Publisher로부터 값을 받으면 이전 저장값에 더해서 Output으로 내보내고 해당 값을 저장합니다.
아래는 예시입니다.
[1, 2, 3, 4, 5, 6, 7, 8, 9, 10].publisher
    .scan(0) { $0 + $1 }
    .sink(receiveValue: { print($0) })
.store(in: &subscriptions)출력.
// 출력
1
3
6
10
15
21
28
36
45
55