
이번 WWDC23의 Expand on Macros 세션의 전반부 정리.
(https://developer.apple.com/wwdc23/10167)
Swift Macro는 컴파일러를 수정하지 않고 Swift 패키지에 배포할 수 있는 방식으로 boilerplate코드를 제거하고 Swift에 고유 언어기능을 추가 가능.
4가지 목적
1. Macro를 사용할 때 매우 명확해야 할 것.
- 2종류의 Macro.
- FreeStanding Macro: 코드에서 다른 항목을 대신함. #(pound)기호로 시작
- Attached Macro: 코드 선언에서 attribute로 사용됨. @(at)기호로 시작
- Swift는 이미 #과 @를 사용해서 특정 컴파일러 동작을 나타내고 있지만, Macro로 이를 확장할 수 있게 만듦.
- #이나 @가 표시되지 않으면 관련 Macro가 없는 것.
2. Macro로 전달된 코드와 Macro에서 다시 전송된 코드가 모두 complete하고, 실수를 체크할 수 있어야 함.
- 인수는 완전한 식이어야 하기 때문에 아래와 같이 ‘1 +’를 Macro로 전달할 수 없음
#unwrap(1 + ) // error: expected expression after operator- 함수 인자와 마찬가지로 Macro인수와 결과가 Type check가 되기 때문에 잘못된 type의 인수를 전달할 수 없음.
@AddCompletionHandler(parameterName: 42)    // error: cannot convert argument of type 'Int' to expected type 'String'
func sendRequest() async throws -> Response

@DictionaryStorage class Options { … } // error: '@DictionaryStorage' can only be applied to a 'struct'- Macro의 구현은 입력의 유효성 체크를 하고 문제가 있을 때 컴파일러 경고, 오류를 내보낼 수 있어 Macro를 올바르게 사용하고 있는지 쉽게 확인이 가능.
3. Macro 확장이 예측 가능하고, 부가적인 방식으로 프로그램에 통합될 것.
- Macro는 프로그램에서 보이는 코드에만 추가할 수 있고 제거나 변경은 안됨. 아래코드에서는 #someUnkwonMacro()가 어떤 동작을 하는지는 모르지만, finishDoingThingy() 호출을 제거하거나 새 함수로 이동시키지는 않는다는 것을 확실히 알 수 있음.
func doThingy() {
    startDoingThingy()

    #someUnknownMacro()

    finishDoingThingy()
}
4. Macro가 뚫을 수 없는 마법이 되어서는 안됨.
- Macro는 프로그램에 더 많은 코드를 추가할 뿐이고 Xcode에서 바로 확인도 가능
- Macro를 사용하는 곳에서 [마우스 우클릭 메뉴 > Expand Macro] 로 확장되는 항목을 확인할 수 있음.
확장 후 break point를 잡고 디버깅도 가능. Macro 확장 내부의 코드가 컴파일되지 않으면 확장에서 error가 있는 위치와 해당 확장이 소스코드에서 어디로 가는지 모두 확인 가능.
- 위 방법들은 closed-source 라이브러리에서 Macro를 제공하는 경우에도 작동함.
- Macro 작성자는 Macro가 잘 동작하는지 확인을 위해 유닛테스트도 작성 가능.
Macro의 수행방법
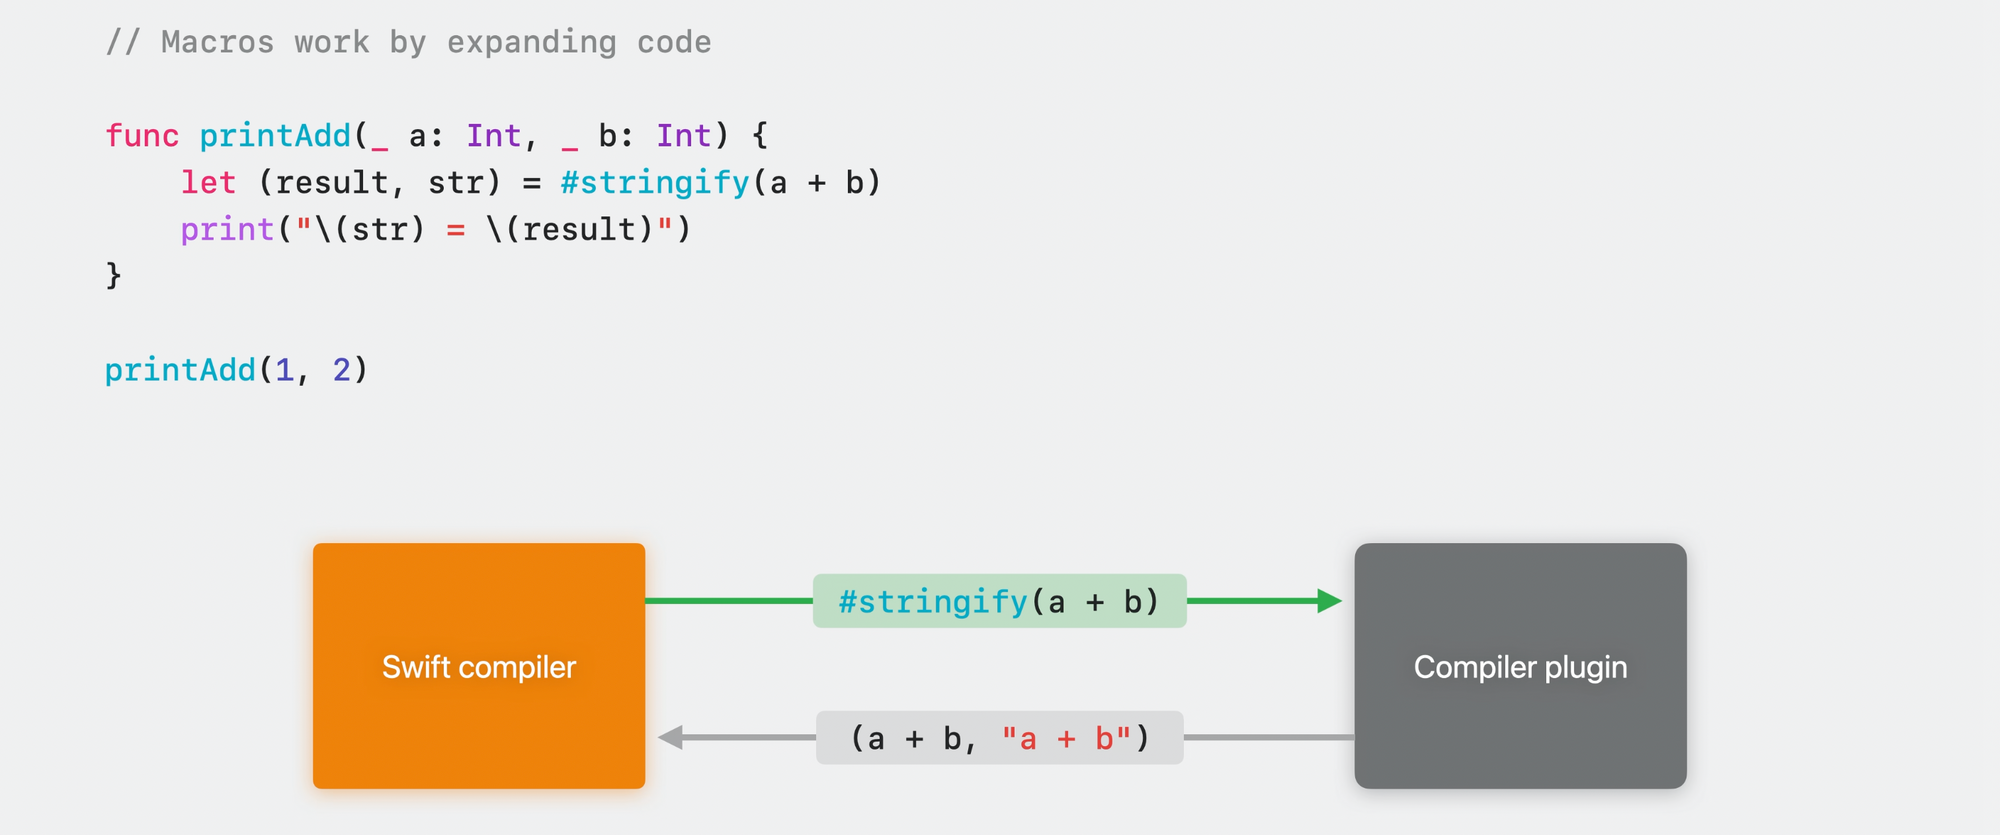
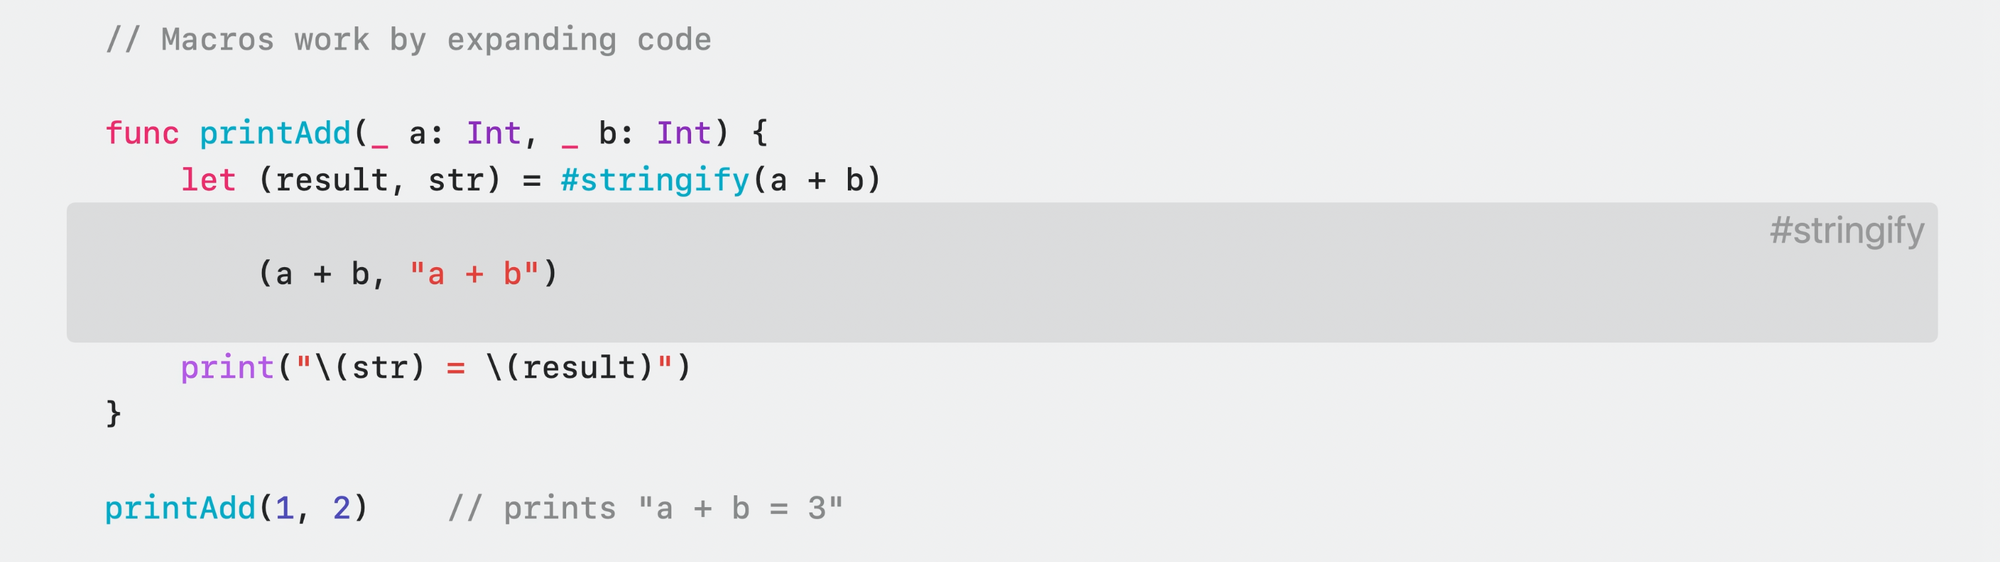
Macro Package 기본 템플릿인 #stringify 예시.
1. Macro 호출할 때, 코드에서 해당 사용을 추출하고 해당 구현을 포함하는 특수 컴파일러 플러그인으로 보냄.플러그인은 보안 샌드박스에서 별도의 프로세스로 실행되고 Macro작성자가 작성한 사용자 정의 Swift 코드를 포함.
2. Macro 사용을 처리하고 Macro에 의해 생성된 새로운 코드조각인 expansion을 반환.
3. 프로그램을 실행시키면 Macro를 호출하는 대신 expansion을 직접 작성한 것처럼 작동.
stringify Macro가 존재한다는 것을 알 수 있는 건 Macro 선언을 통해서 알 수 있음.
Macro 선언은 Macro에 대한 API를 제공. 자신의 모듈에서 바로 선언을 작성하거나 라이브러리, 프레임워크에서 가져올 수 있음.
/// Creates a tuple containing both the result of `expr` and its source code represented as a
/// `String`.
@freestanding(expression)
macro stringify<T>(_ expr: T) -> (T, String)함수 선언처럼 Macro 이름, signiture, 매개변수 갯수, 레이블 type, 결과 type(Macro에 있는 경우)을 지정.
Macro의 Role(역할)을 지정하는 하나 이상의 attribute도 있음. 역할이 무엇인지 생각하지 않고 Macro를 작성할 수는 없음.
Macro의 Roles
Role은 Macro에 대한 일련의 규칙.
- Macro를 적용하는 위치와 방법
- expansion되는 코드의 종류
- 해당 expansion이 코드에 삽입되는 위치를 제어.
예측 가능하고 부가적인 방식으로 확장을 삽입하려는 것이 목적.
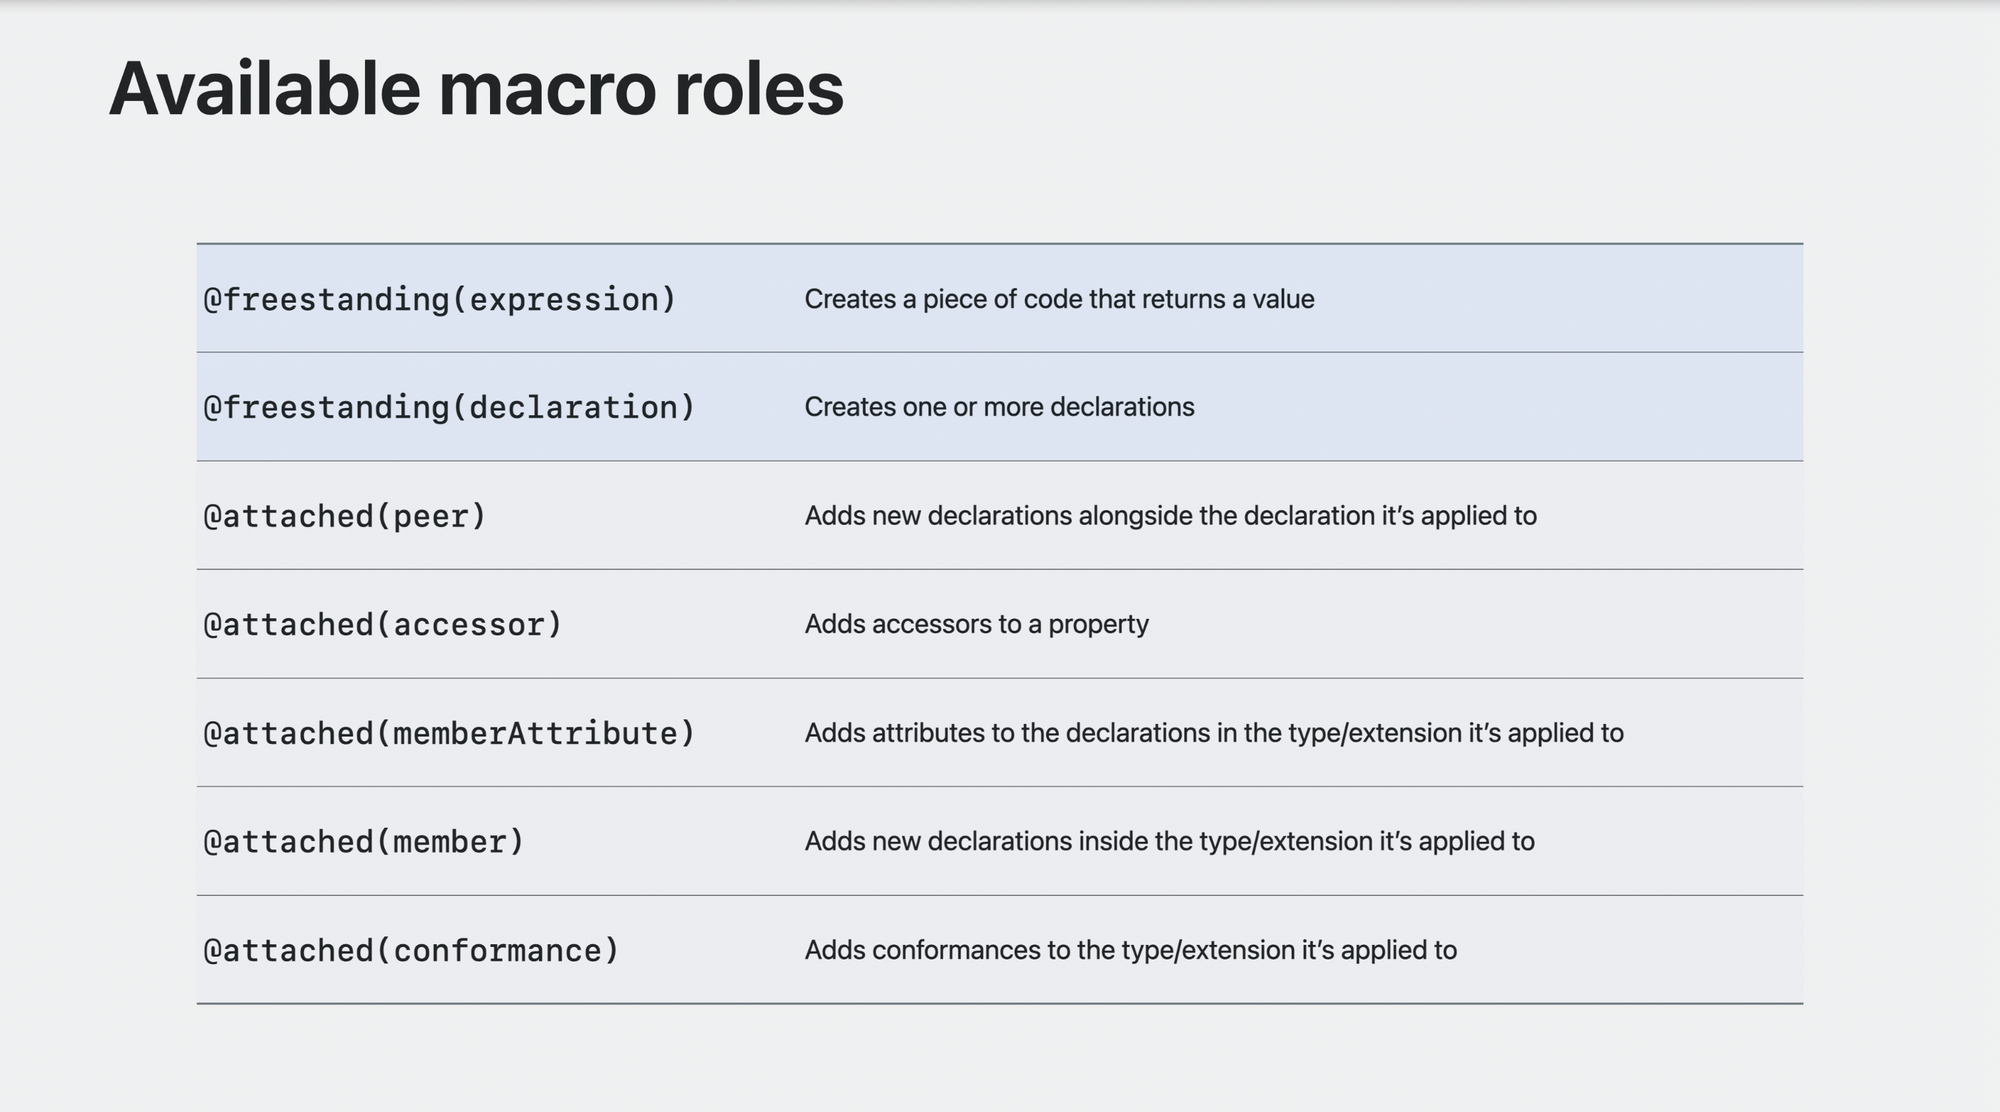
@freestanding Macro를 만드는 2가지 Role
- expression(표현식)
- declaration(선언)
@attached Macro를 만드는 5가지 Role
- peer
- accessor
- memberAttribute
- member
- conformance
@freestanding
@freestanding(expression)
expression은 실행하고 결과를 생성하는 코드 단위.
let numPixels = (x + width) * (y + height)
//              ^~~~~~~~~~~~~~~~~~~~~~~~~~ This is an expression
//               ^~~~~~~~~                 But so is this
// ^~~~~ And this등호 뒤 산술은 expression. expression은 재귀적인 구조를 가지고, 종종 더 작은 expression으로 구성됨.
(x + width) 자체도 표현식. width 자체도 표현식일 수 있음.
freestanding expression은 expression으로 expand되는 매크로.
// Some teams are nervous about this:
let image = downloadedImage!

// Alternatives are super wordy:
guard let image = downloadedImage else {
    preconditionFailure("Unexpectedly found nil: downloadedImage was already checked")
}위와 같이 옵셔널을 강제로 언래핑하는 건 위험한데, 아래처럼 guard let 바인딩으로 nil이면 안되는 이유를 쓰는 건 과함.
/// Force-unwraps the optional value passed to `expr`.
/// - Parameter message: Failure message, followed by `expr` in single quotes
@freestanding(expression)
macro unwrap<Wrapped>(_ expr: Wrapped?, message: String) -> Wrapped위와 같이 freestanding expression으로 값을 계산하고 반환하는 Macro를 만들 수 있음.
unwrap이라는 이름, optional한 Wrapped제네릭 값과 unwrap 실패시 출력될 메세지에 쓰일 String을 전달하고, non-optional한 Wrapped 제네릭 값을 반환.
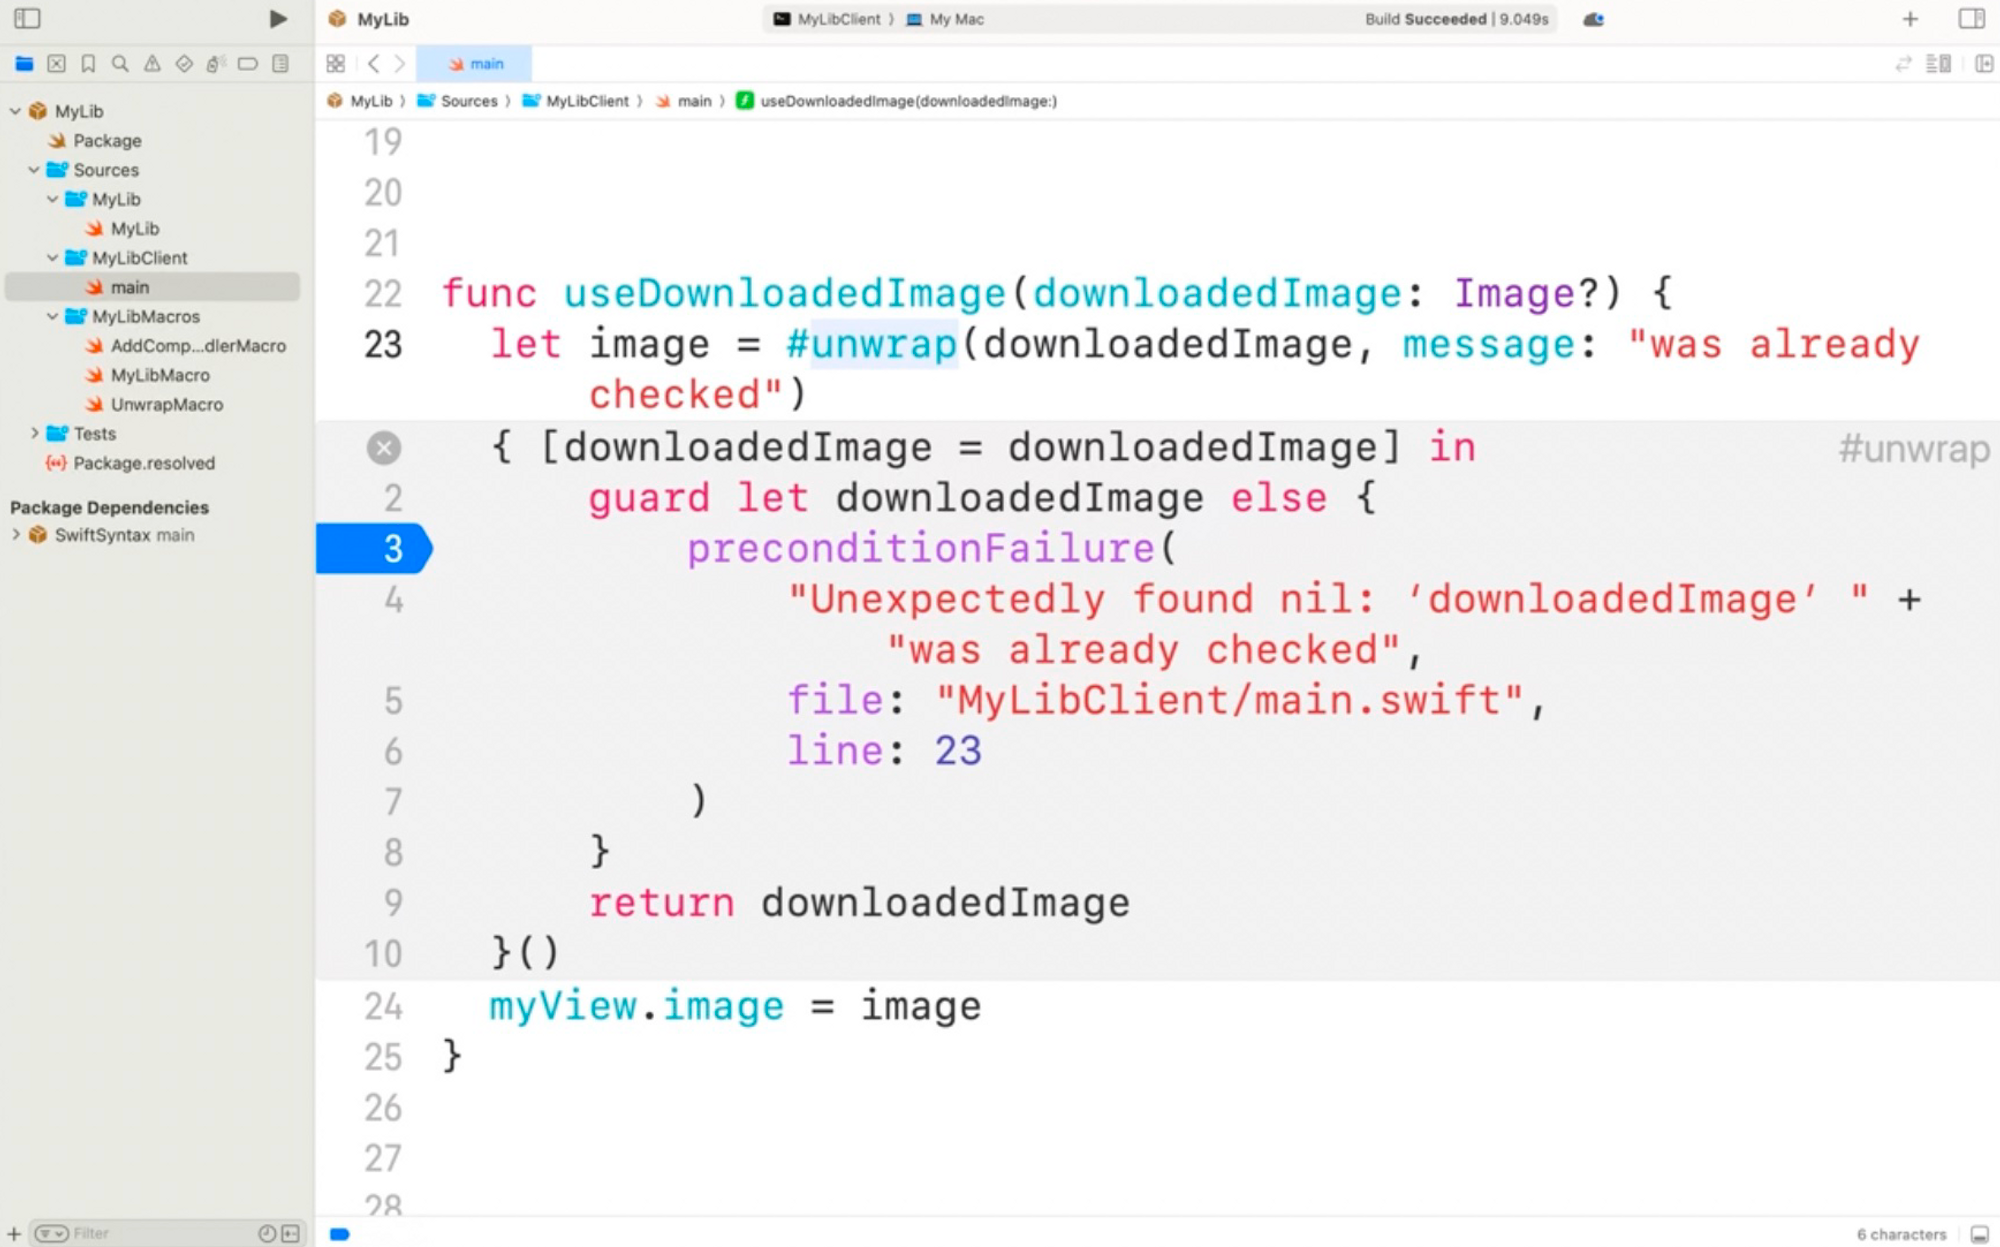
let image = #unwrap(downloadedImage, message: "was already checked")함수 호출처럼 사용.
expand를 하면 위처럼 확장된 것을 확인.
error메세지에서는 일반함수에서는 쓸 수 없는 변수명도 포함시킬 수 있음.
@freestanding(declaration)
함수, 변수, type과 같은 하나 이상의 선언으로 확장.

위와 같은 2D배열 type이 필요한 일종의 통계분석을 작성하는 상황을 예시.
배열의 모든 행(rows)이 동일한 수의 열(columns)을 갖기를 원하므로 array-of-arrays를 원하지 않음.

대신 element를 평평한 1차원 배열에 저장한 다음 개발자가 전달한 2차원 인덱스에서 1차원 인덱스를 계산하려고 함.
public struct Array2D<Element>: Collection {
    public struct Index: Hashable, Comparable { var storageIndex: Int }

    var storage: [Element]
    var width1: Int

    public func makeIndex(_ i0: Int, _ i1: Int) -> Index {
        Index(storageIndex: i0 * width1 + i1)
    }

    public subscript (_ i0: Int, _ i1: Int) -> Element {
        get { self[makeIndex(i0, i1)] }
        set { self[makeIndex(i0, i1)] = newValue }
    }

    public subscript (_ i: Index) -> Element {
        get { storage[i.storageIndex] }
        set { storage[i.storageIndex] = newValue }
    }

    // Note: Omitted additional members needed for 'Collection' conformance
}이를 기존 함수로 작성한 예시.
makeIndex(_:_:)->Index 함수는 2D 인덱스에 필요한 두 개의 Int를 취한 다음 약간의 산술을 수행하여 1D 인덱스로 변환.
그런데 프로그램 다른 곳에서 3D 배열이 필요하다는 것을 할게 되어 아래와 같이 또 추가로 작성.
public struct Array3D<Element>: Collection {
    public struct Index: Hashable, Comparable { var storageIndex: Int }

    var storage: [Element]
    var width1, width2: Int

    public func makeIndex(_ i0: Int, _ i1: Int, _ i2: Int) -> Index {
        Index(storageIndex: (i0 * width1 + i1) * width2 + i2)
    }

    public subscript (_ i0: Int, _ i1: Int, _ i2: Int) -> Element {
        get { self[makeIndex(i0, i1, i2)] }
        set { self[makeIndex(i0, i1, i2)] = newValue }
    }

    public subscript (_ i: Index) -> Element {
        get { storage[i.storageIndex] }
        set { storage[i.storageIndex] = newValue }
    }

    // Note: Omitted additional members needed for 'Collection' conformance
}Array2D보다 인덱스가 좀 더 있고, 좀 더 복잡한 형태. 만약 4D, 5D, … 계속 늘어나게 되면??
이런 각 구조체들은 declaration(선언)이므로 decalaration Macro로 만들 수 있음.
/// Declares an `n`-dimensional array type named `Array<n>D`.
/// - Parameter n: The number of dimensions in the array.
@freestanding(declaration, names: arbitrary)
macro makeArrayND(n: Int)N차원배열 타입을 생성하기 위한 makeArrayND(n:) 이름의 @freestanding(declaration) Macro를 선언.
차원 수를 n 매개변수로 전달, result 타입을 선언하지 않음. 이 Macro는 다른 코드에서 사용되는 결과를 계산하는 것이 아니라, 프로그램에 선언을 추가하는 것이기 때문.
n을 넣어주는 것에 따라 n차원 배열에 따른 계산해주는 배열 유형으로 확장됨.
@attached
특정 선언에 attach됨 → 작업할 정보가 더 많다는 의미.
@freestanding Macro는 전달된 인수만 제공되지만,
@attached Macro는 연결된 선언에 접근도 가능. 해당 선언을 검사하고 내부에서 이름, 타입, 기타 정보를 꺼내서 사용.
@attached(peer)
변수, 함수, 타입 뿐만 아니라 import 및 operator 선언과 같은 모든 선언에 연결(attached)할 수 있으며 새 선언을 함께 삽입할 수 있음.
→ 메서드, 프로퍼티 에서 사용하면 해당 타입의 멤버가 생성되지만, 최상위 함수나 타입에서 사용하면 새로운 최상위 선언이 생성됨.
사용 예시
func fetchAvatar(_ username: String) async -> Image? {
    ...
}

func fetchAvatar(_ username: String, onCompletion: @escaping (Image?) -> Void) {
    Task.detached { onCompletion(await fetchAvatar(username)) }
}Swift Concurrency를 사용하는 라이브러리를 작성하고 있는데, 일부 클라이언트가 여전히 이전 동시성 기술을 사용하고 있음을 알고 있으므로 completeHandler를 사용하는 API버전을 제공하려고 한다고 가정한 예시.
이 작업이 어렵진 않지만, 이런 것이 여러개 있다고 한다면 @attached(peer) Macro로 반복 작업을 줄여줄 수 있음.
/// Overload an `async` function to add a variant that takes a completion handler closure as
/// a parameter.
@attached(peer, names: overloaded)
macro AddCompletionHandler(parameterName: String = "completionHandler")AddCompletionHandler를 선언하고, completeHandler의 parameterName에 대한 매개변수를 지정하고 해당 Macro를 메서드의 async 버전과 attach시킴.
Macro는 원본과 동일한 Completion Handler기반 signature를 생성하고, completion handler에 대한 추가 텍스트가 있는 코멘트 주석을 첨부.
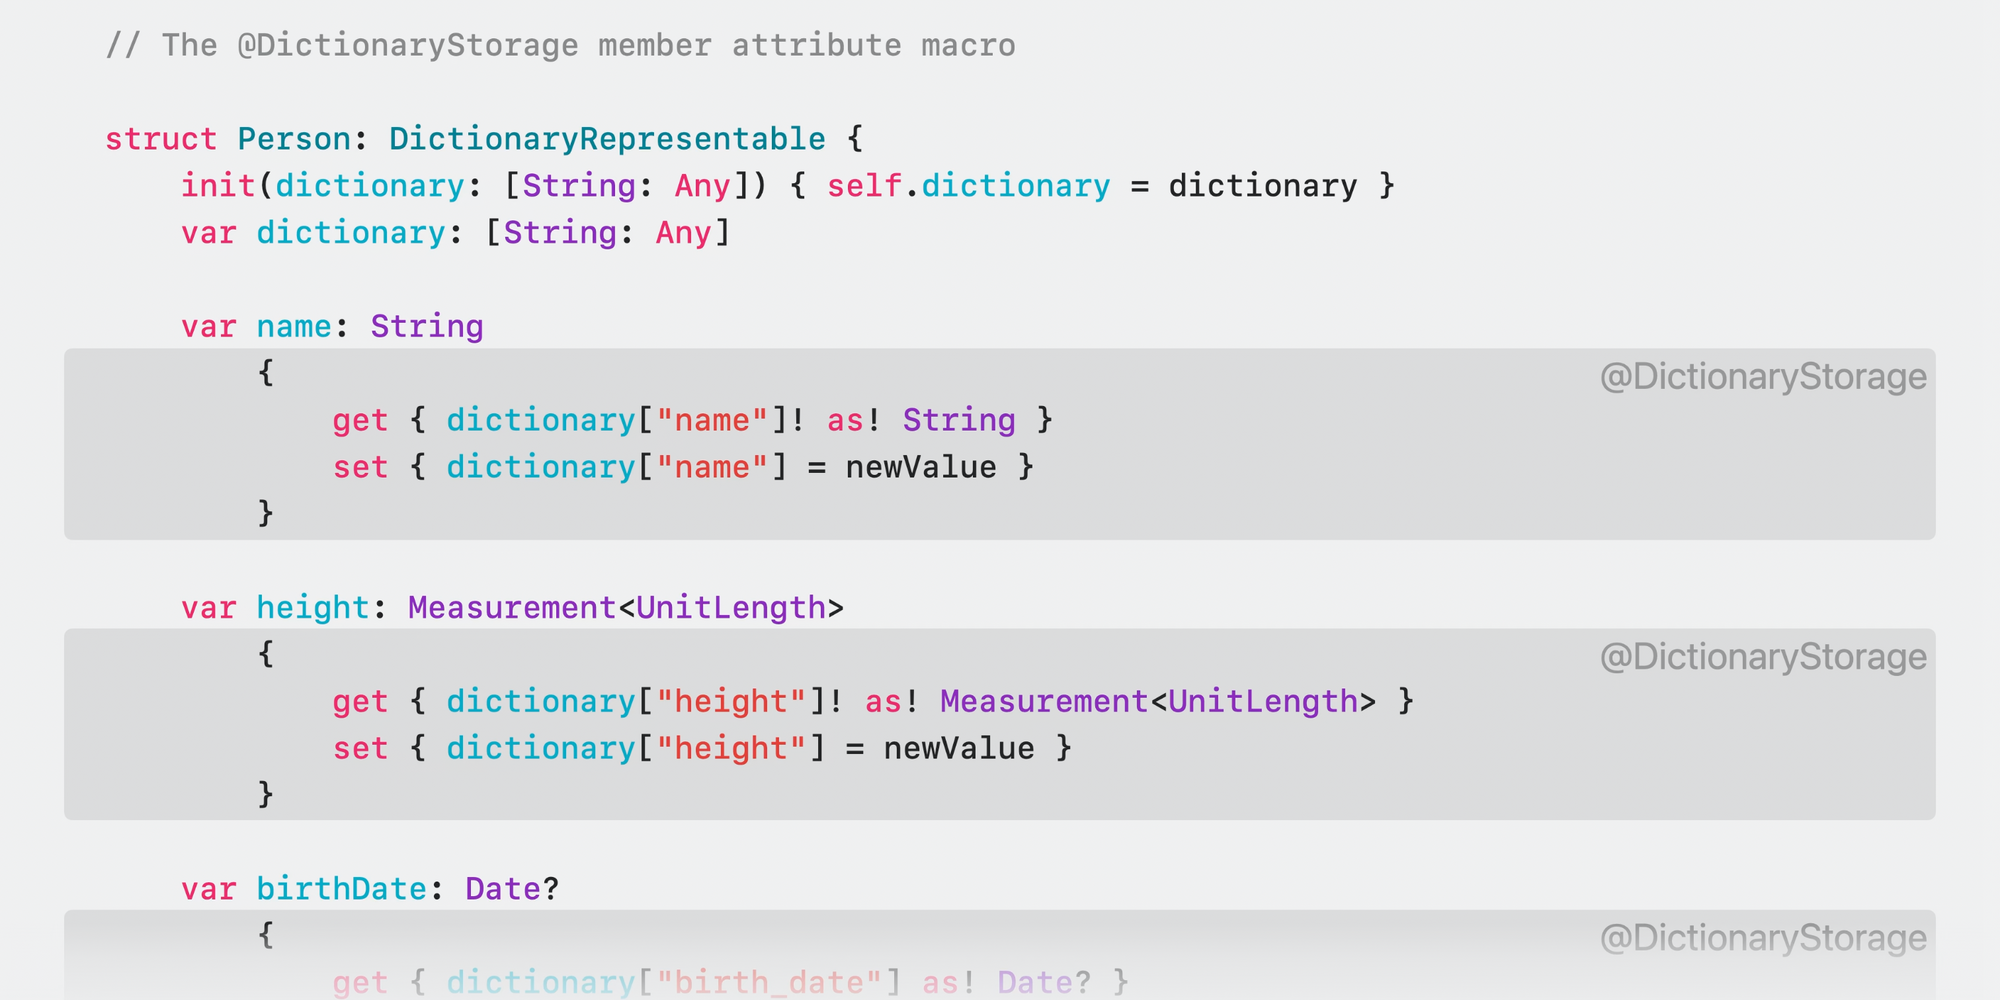
@attached(accessor)
accessor: 접근자
변수, 서브스크립트에 attach될 수 있고
get, set, willSet, didSet과 같은 accessor를 install할 수 있음.
dictionary를 감싸고 프로퍼티를 사용해서 컨텐츠에 접근할 수 있는 여러 타입이 있다고 가정.
struct Person: DictionaryRepresentable {
    init(dictionary: [String: Any]) { self.dictionary = dictionary }
    var dictionary: [String: Any]

    var name: String {
        get { dictionary["name"]! as! String }
        set { dictionary["name"] = newValue }
    }
    var height: Measurement<UnitLength> {
        get { dictionary["height"]! as! Measurement<UnitLength> }
        set { dictionary["height"] = newValue }
    }
    var birthDate: Date? {
        get { dictionary["birth_date"] as! Date? }
        set { dictionary["birth_date"] = newValue as Any? }
    }
}
예시. Person 구조체를 사용하면 name, height, birthData 필드에 접근할 수 있지만 Dictionary에 이 세 개 필드 외에 다른 정보가 있으면 프로그램에서 해당 정보를 preserved하고 무시함.
이 세 가지 프로퍼티에는 계산된 getter 및 setter가 필요하지만 손으로 작성하는 것은 지루하고 프로퍼티래퍼는 함께 사용되는 유형의 다른 저장된 속성에 액세스할 수 없기 때문에 프로퍼티래퍼를 사용할 수 없음.
이를 @attached(accessor) Macro로 해결할 수 있음.
@attached(accessor)
macro DictionaryStorage(key: String? = nil)DictionaryStorage Macro를 작성. Dictionary에 언더바가 있는 birth_data 철자가 있기 때문에 key 매개변수를 제공하지만 nil로 둘 수 있도록 optional.
struct Person: DictionaryRepresentable {
    init(dictionary: [String: Any]) { self.dictionary = dictionary }
    var dictionary: [String: Any]

    @DictionaryStorage var name: String
    @DictionaryStorage var height: Measurement<UnitLength>
    @DictionaryStorage(key: "birth_date") var birthDate: Date?
}이렇게 각 프로퍼티 앞에 작성해주면 Macro가 알아서 접근자를 생성.
위처럼 개선이 되었지만 여전히 boilerplate 코드가 있음. 일부 built-in attribute를 전체 타입 혹은 확장에 적용해서 이런 종류의 상황을 처리할 수 있음
→ @attached(memberAttribute) 로 처리
@attached(memberAttribute)
타입이나 extension에 attach되며 attach된 모든 멤버에 attribute를 추가할 수 있음.
/// Adds accessors to get and set the value of the specified property in a dictionary
/// property called `storage`.
@attached(memberAttribute)
@attached(accessor)
macro DictionaryStorage(key: String? = nil)이번에는 새 Macro를 선언하는 대신 이미 가지고 있는 @attached(accessor) Role과 함께, DictionaryStorage Macro에 다른 Role attribute를 추가.
→ Role Composition: Swift가 어떤 Role을 사용해야 할지 모르는 곳이 있기 때문에 (2가지 freestanding을 제외하고) 모두 Role을 조합해서 composition할 수 있음.
@DictionaryStorage를
- 타입에 붙이면 멤버 attribute Role을 확장.
- 프로퍼티에 붙이면 accessor Role을 확장.
- 함수에 붙이면 DictionaryStorage에 함수를 attach할 수 있는 Role이 없기 때문에 컴파일 에러가 발생.
@DictionaryStorage
struct Person: DictionaryRepresentable {
    init(dictionary: [String: Any]) { self.dictionary = dictionary }
    var dictionary: [String: Any]

    var name: String
    var height: Measurement<UnitLength>

    @DictionaryStorage(key: "birth_date") var birthDate: Date?
}이 두번째 Role을 DictionaryStorage에 추가하면 모든 프로퍼티에 별도로 attach하는 대신 전체 타입에 attach할 수 있게 됨.
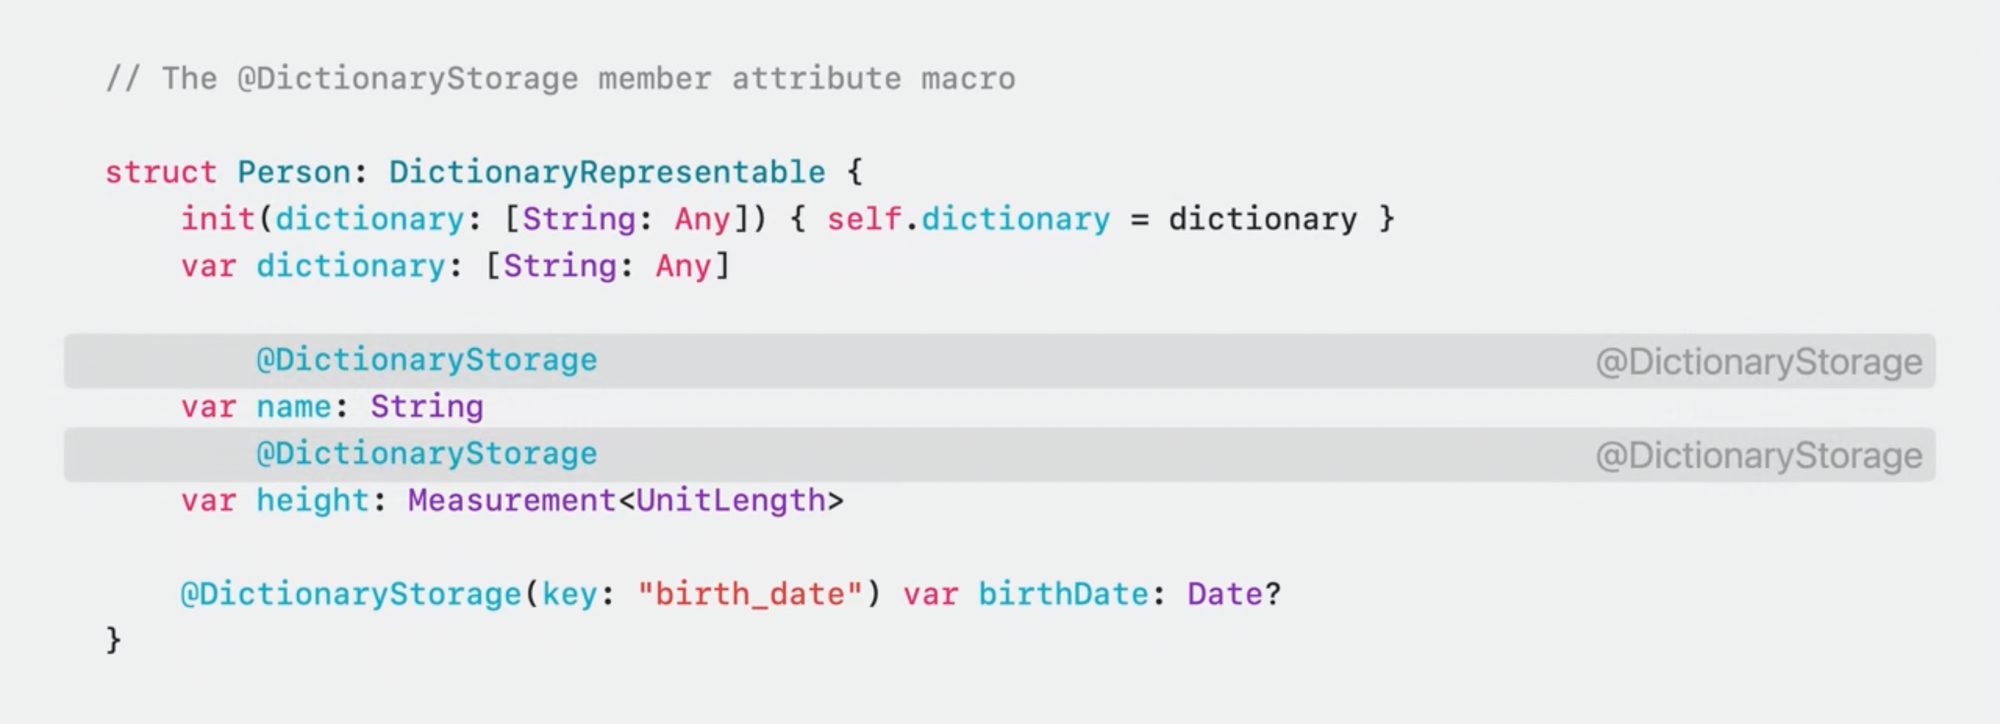
Macro는 이니셜라이저, Dictionary 프로퍼티, 이미 DictionaryStorage attribute인 birth_date 프로퍼티 같은 특정 멤버를 건너뛰는 로직이 있음.
그 외의 저장 프로퍼티에 DictionaryStorage attribute를 추가하고 위처럼 확장됨.
여기서 이니셜라이저와 저장 프로퍼티를 더 개선할 수 있음.
DictionaryRepresentable 프로토콜에서 이 개선이 필요하고, 프로퍼티는 accessor에 의해 사용되지만 DictionaryStorage를 사용하는 모든 타입에서 동일함. DictionaryStorage가 이들을 자동으로 추가하도록 만들 수 있음.
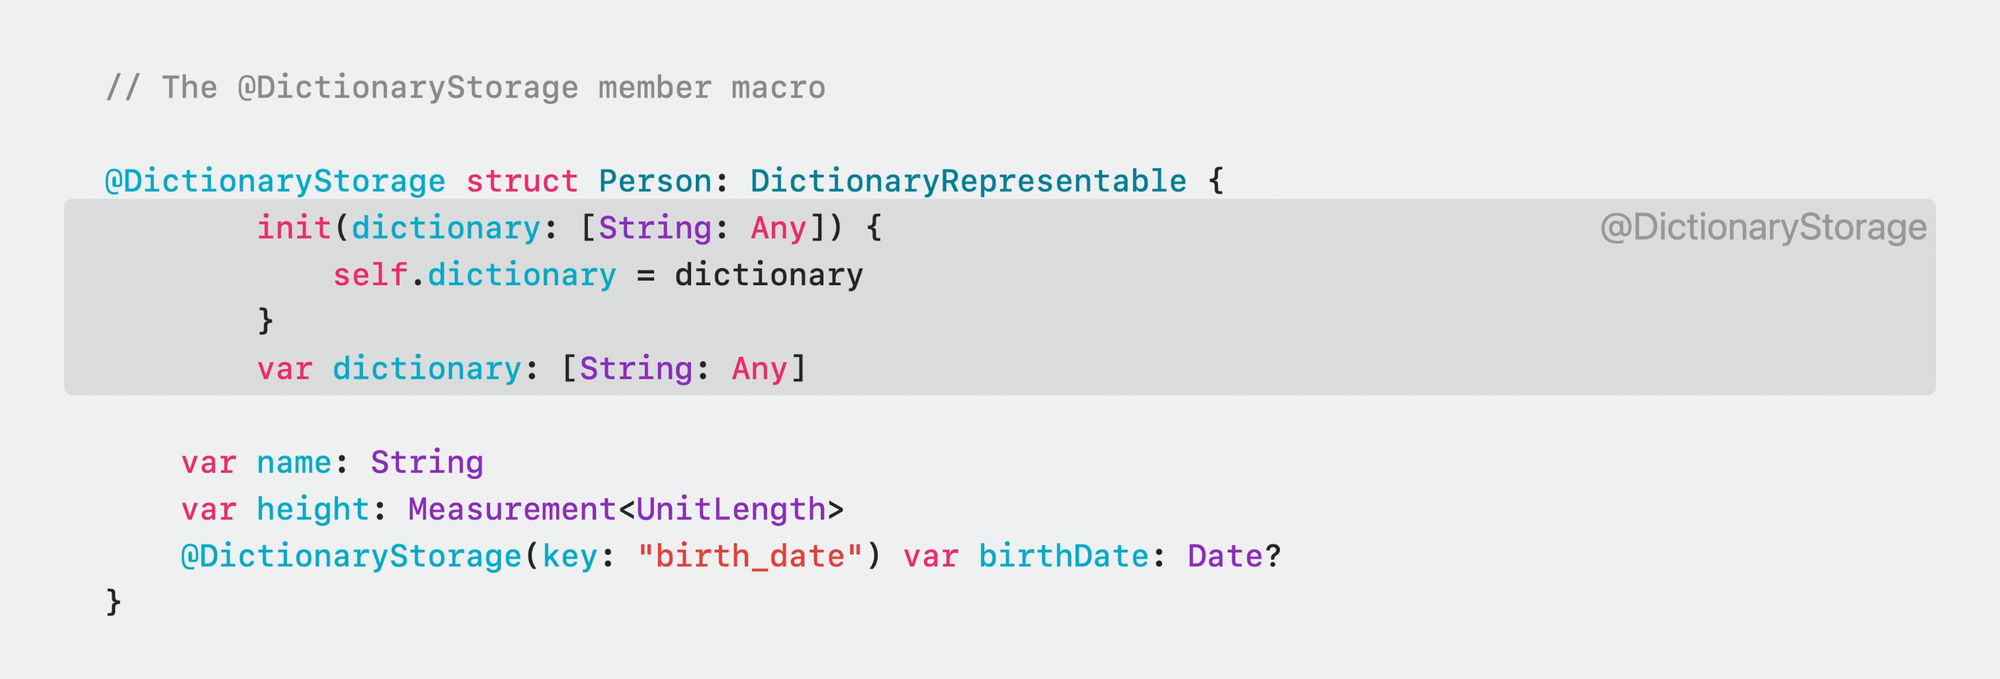
→ @attached(member)
@attached(member)
memberAttribute Macro와 마찬가지로, 타입 및 extension에 사용할 수 있지만 기존 멤버에 attribute를 추가하는 대신
완전히 새로운 멤버를 추가할 수 있음. 메서드, 프로퍼티, 이니셜라이저 등 추가 가능.
클래스, 구조체에 저장 프로퍼티를 추가하거나 열거형에 case도 추가 가능.
/// Adds accessors to get and set the value of the specified property in a dictionary
/// property called `storage`.
@attached(member, names: named(dictionary), named(init(dictionary:)))
@attached(memberAttribute)
@attached(accessor)
macro DictionaryStorage(key: String? = nil)DictionaryStorage에 @attached(member) Role을 추가해서 기존 Role들과 Composition.
이 Role은 이니셜라이저와 dictionary라는 프로퍼티를 추가시킴.
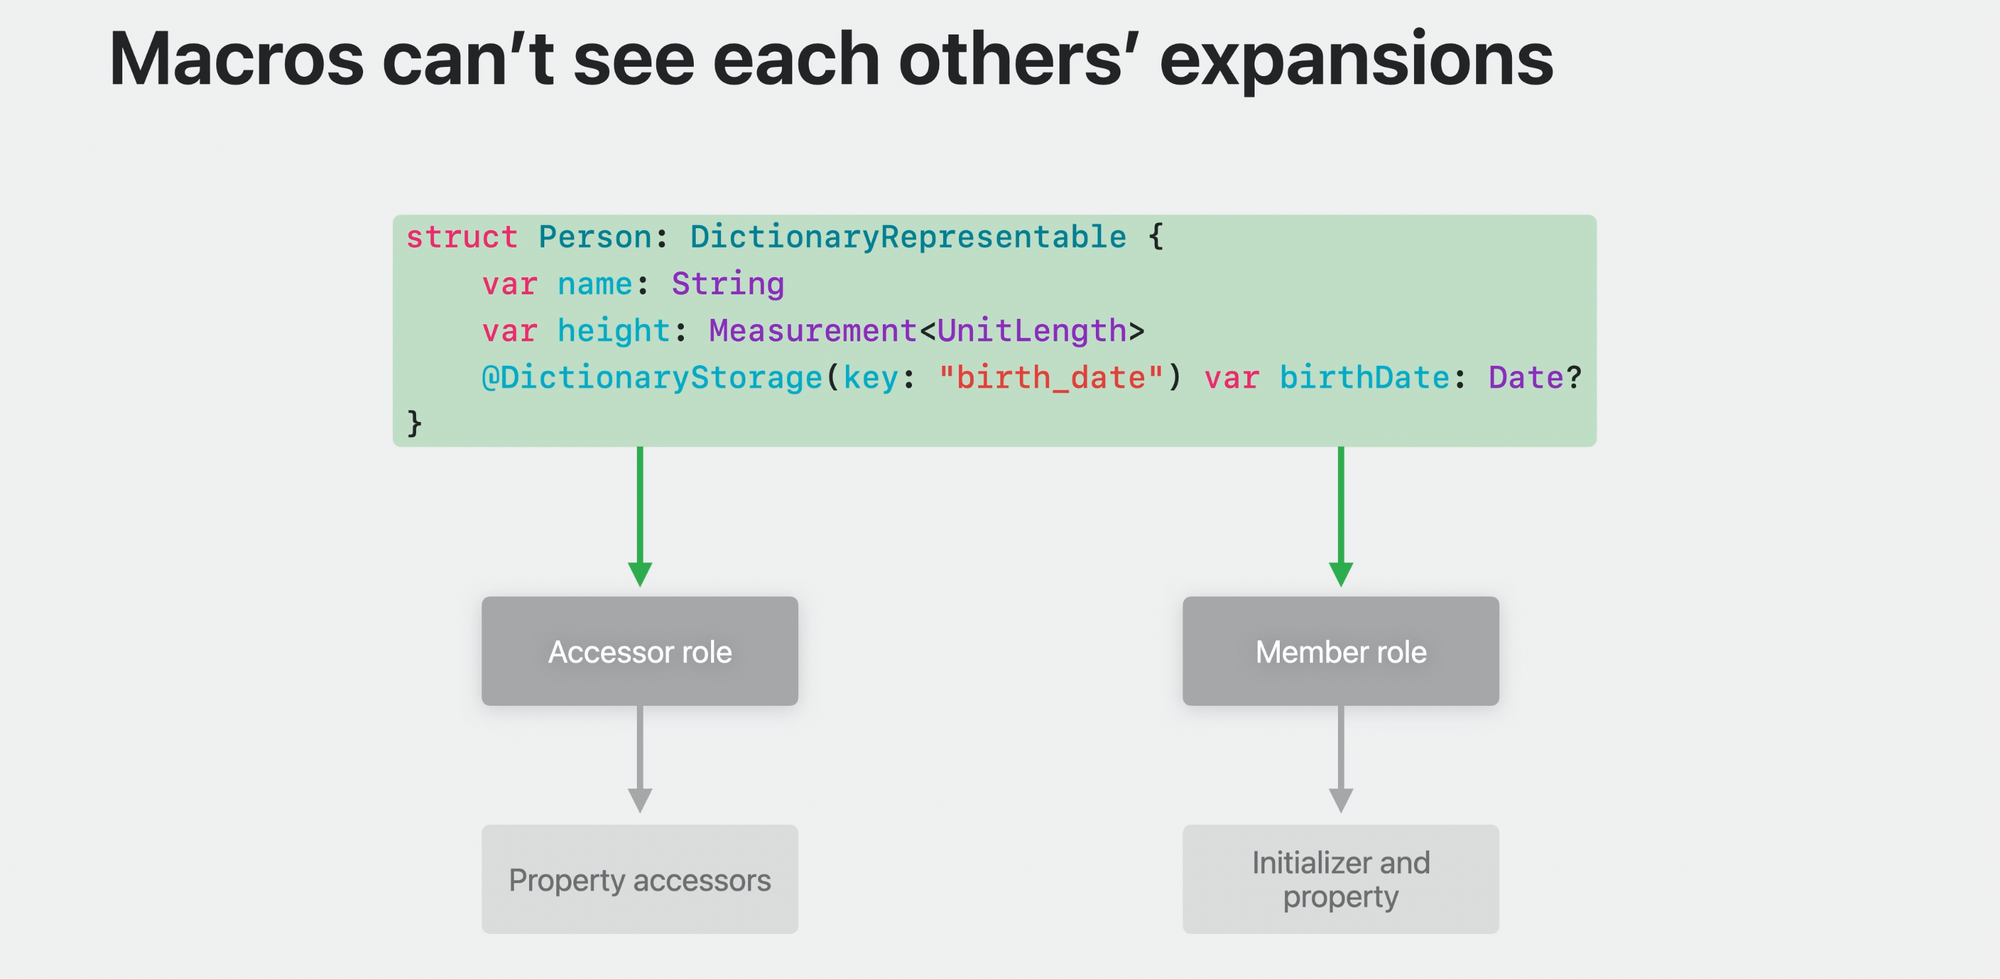
두 개의 서로 다른 Macro가 동일한 코드에 적용될 때 어느 것이 먼저 확장될지? → 별로 중요하지 않음.
각각은 다른 것에서 제공한 확장없이 선언의 원래 버전을 볼 수 있음. 따라서 순서를 걱정할 필요가 없음.
컴파일러가 언제 Macro를 확장하든 상관없이 동일한 내용을 볼 수 있음.
@DictionaryStorage struct Person: DictionaryRepresentable {
    var name: String
    var height: Measurement<UnitLength>

    @DictionaryStorage(key: "birth_date") var birthDate: Date?
}@attached(member) Role이 추가되었기 때문에 더 이상 두 멤버를 작성할 필요조차 없게 됨.
이제 @DictionaryStorage를 작성만 하면
- 이니셜라이저와 dictionary 멤버를 추가시키고,
- 프로퍼티들에 DictionaryStorage attribute를 추가시키고,
- 해당 프로퍼티들이 accessor로 확장됨.
하지만 아직 DictionaryRepresentable 프로토콜에 대한 적합성에 대한 boilerplate가 남아 있음.
→ @attached(conformance) Role로 이를 처리
@attached(conformance)
타입이나 extension에 적합성을 추가시킬 수 있음.
/// Adds accessors to get and set the value of the specified property in a dictionary
/// property called `storage`.
@attached(conformance)
@attached(member, names: named(dictionary), named(init(dictionary:)))
@attached(memberAttribute)
@attached(accessor)
macro DictionaryStorage(key: String? = nil)DictionaryStorage Macro에 @attached(conformance) Role을 추가해서 기존 3가지 Role과 composition.
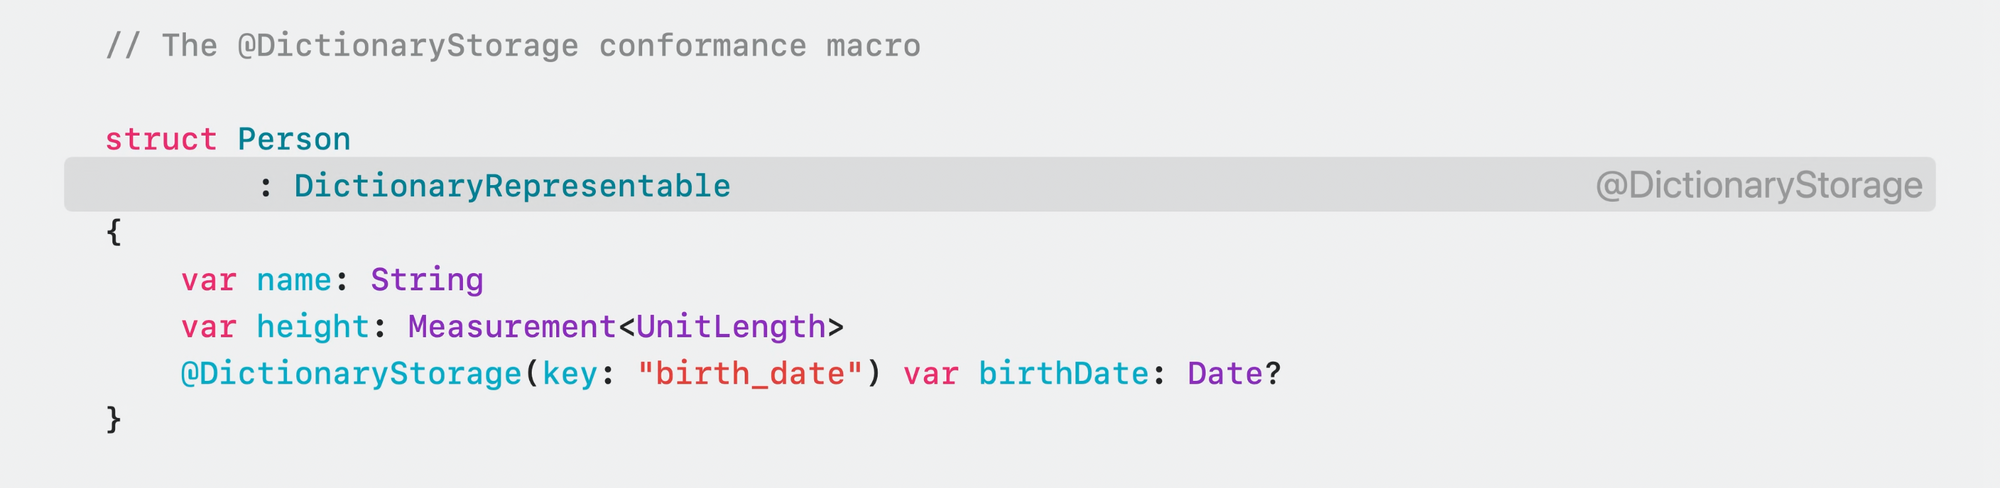
@DictionaryStorage struct Person { // DictionaryRepresentable 프로토콜 제거
    var name: String
    var height: Measurement<UnitLength>
    @DictionaryStorage(key: "birth_date") var birthDate: Date?
}이제 수동으로 적합성을 작성할 필요가 없게 됨.
accessor와 생성된 멤버에 대해 이미 추가한 DictionaryStorage attribute는 이제 이미 수행되고 있던 다른 모든 작업들과 함께 적합성을 자동으로 추가시킴.
이번 WWDC23의 Expand on Macros 세션의 전반부 정리.
(https://developer.apple.com/wwdc23/10167)
Swift Macro는 컴파일러를 수정하지 않고 Swift 패키지에 배포할 수 있는 방식으로 boilerplate코드를 제거하고 Swift에 고유 언어기능을 추가 가능.
4가지 목적
1. Macro를 사용할 때 매우 명확해야 할 것.
- 2종류의 Macro.
- FreeStanding Macro: 코드에서 다른 항목을 대신함. #(pound)기호로 시작
- Attached Macro: 코드 선언에서 attribute로 사용됨. @(at)기호로 시작
- Swift는 이미 #과 @를 사용해서 특정 컴파일러 동작을 나타내고 있지만, Macro로 이를 확장할 수 있게 만듦.
- #이나 @가 표시되지 않으면 관련 Macro가 없는 것.
2. Macro로 전달된 코드와 Macro에서 다시 전송된 코드가 모두 complete하고, 실수를 체크할 수 있어야 함.
- 인수는 완전한 식이어야 하기 때문에 아래와 같이 ‘1 +’를 Macro로 전달할 수 없음
#unwrap(1 + ) // error: expected expression after operator- 함수 인자와 마찬가지로 Macro인수와 결과가 Type check가 되기 때문에 잘못된 type의 인수를 전달할 수 없음.
@AddCompletionHandler(parameterName: 42)    // error: cannot convert argument of type 'Int' to expected type 'String'
func sendRequest() async throws -> Response

@DictionaryStorage class Options { … } // error: '@DictionaryStorage' can only be applied to a 'struct'- Macro의 구현은 입력의 유효성 체크를 하고 문제가 있을 때 컴파일러 경고, 오류를 내보낼 수 있어 Macro를 올바르게 사용하고 있는지 쉽게 확인이 가능.
3. Macro 확장이 예측 가능하고, 부가적인 방식으로 프로그램에 통합될 것.
- Macro는 프로그램에서 보이는 코드에만 추가할 수 있고 제거나 변경은 안됨. 아래코드에서는 #someUnkwonMacro()가 어떤 동작을 하는지는 모르지만, finishDoingThingy() 호출을 제거하거나 새 함수로 이동시키지는 않는다는 것을 확실히 알 수 있음.
func doThingy() {
    startDoingThingy()

    #someUnknownMacro()

    finishDoingThingy()
}
4. Macro가 뚫을 수 없는 마법이 되어서는 안됨.
- Macro는 프로그램에 더 많은 코드를 추가할 뿐이고 Xcode에서 바로 확인도 가능
- Macro를 사용하는 곳에서 [마우스 우클릭 메뉴 > Expand Macro] 로 확장되는 항목을 확인할 수 있음.
확장 후 break point를 잡고 디버깅도 가능. Macro 확장 내부의 코드가 컴파일되지 않으면 확장에서 error가 있는 위치와 해당 확장이 소스코드에서 어디로 가는지 모두 확인 가능.
- 위 방법들은 closed-source 라이브러리에서 Macro를 제공하는 경우에도 작동함.
- Macro 작성자는 Macro가 잘 동작하는지 확인을 위해 유닛테스트도 작성 가능.
Macro의 수행방법
Macro Package 기본 템플릿인 #stringify 예시.
1. Macro 호출할 때, 코드에서 해당 사용을 추출하고 해당 구현을 포함하는 특수 컴파일러 플러그인으로 보냄.플러그인은 보안 샌드박스에서 별도의 프로세스로 실행되고 Macro작성자가 작성한 사용자 정의 Swift 코드를 포함.
2. Macro 사용을 처리하고 Macro에 의해 생성된 새로운 코드조각인 expansion을 반환.
3. 프로그램을 실행시키면 Macro를 호출하는 대신 expansion을 직접 작성한 것처럼 작동.
stringify Macro가 존재한다는 것을 알 수 있는 건 Macro 선언을 통해서 알 수 있음.
Macro 선언은 Macro에 대한 API를 제공. 자신의 모듈에서 바로 선언을 작성하거나 라이브러리, 프레임워크에서 가져올 수 있음.
/// Creates a tuple containing both the result of `expr` and its source code represented as a
/// `String`.
@freestanding(expression)
macro stringify<T>(_ expr: T) -> (T, String)
함수 선언처럼 Macro 이름, signiture, 매개변수 갯수, 레이블 type, 결과 type(Macro에 있는 경우)을 지정.
Macro의 Role(역할)을 지정하는 하나 이상의 attribute도 있음. 역할이 무엇인지 생각하지 않고 Macro를 작성할 수는 없음.
Macro의 Roles
Role은 Macro에 대한 일련의 규칙.
- Macro를 적용하는 위치와 방법
- expansion되는 코드의 종류
- 해당 expansion이 코드에 삽입되는 위치를 제어.
예측 가능하고 부가적인 방식으로 확장을 삽입하려는 것이 목적.
@freestanding Macro를 만드는 2가지 Role
- expression(표현식)
- declaration(선언)
@attached Macro를 만드는 5가지 Role
- peer
- accessor
- memberAttribute
- member
- conformance
@freestanding
@freestanding(expression)
expression은 실행하고 결과를 생성하는 코드 단위.
let numPixels = (x + width) * (y + height)
//              ^~~~~~~~~~~~~~~~~~~~~~~~~~ This is an expression
//               ^~~~~~~~~                 But so is this
//                   ^~~~~                 And this
등호 뒤 산술은 expression. expression은 재귀적인 구조를 가지고, 종종 더 작은 expression으로 구성됨.
(x + width) 자체도 표현식. width 자체도 표현식일 수 있음.
freestanding expression은 expression으로 expand되는 매크로.
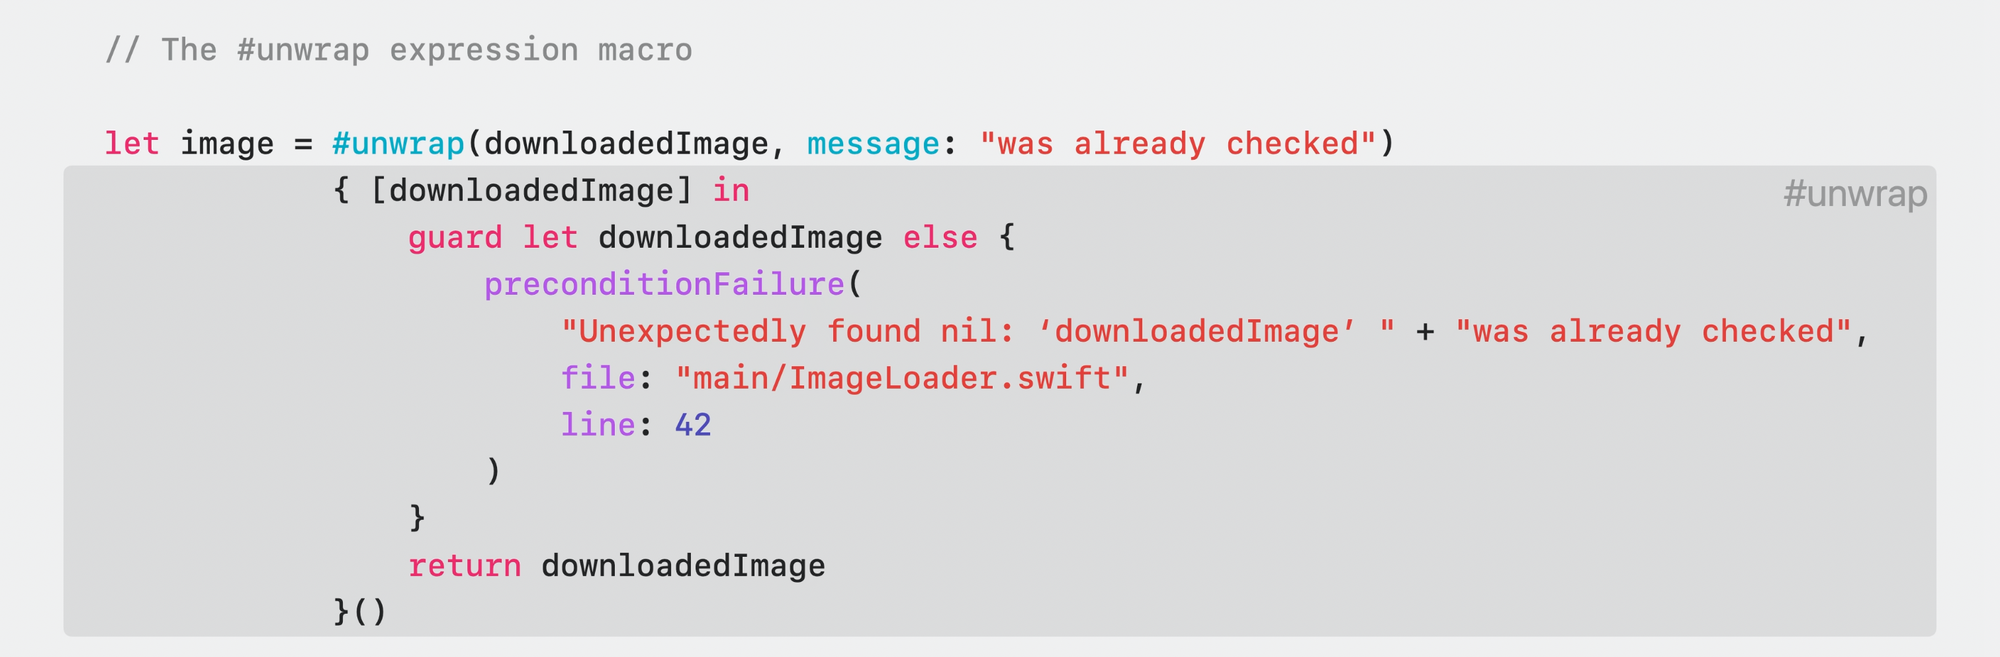
// Some teams are nervous about this:
let image = downloadedImage!

// Alternatives are super wordy:
guard let image = downloadedImage else {
    preconditionFailure("Unexpectedly found nil: downloadedImage was already checked")
}
위와 같이 옵셔널을 강제로 언래핑하는 건 위험한데, 아래처럼 guard let 바인딩으로 nil이면 안되는 이유를 쓰는 건 과함.
/// Force-unwraps the optional value passed to `expr`.
/// - Parameter message: Failure message, followed by `expr` in single quotes
@freestanding(expression)
macro unwrap<Wrapped>(_ expr: Wrapped?, message: String) -> Wrapped
위와 같이 freestanding expression으로 값을 계산하고 반환하는 Macro를 만들 수 있음.
unwrap이라는 이름, optional한 Wrapped제네릭 값과 unwrap 실패시 출력될 메세지에 쓰일 String을 전달하고, non-optional한 Wrapped 제네릭 값을 반환.
let image = #unwrap(downloadedImage, message: "was already checked")함수 호출처럼 사용.
expand를 하면 위처럼 확장된 것을 확인.
error메세지에서는 일반함수에서는 쓸 수 없는 변수명도 포함시킬 수 있음.
@freestanding(declaration)
함수, 변수, type과 같은 하나 이상의 선언으로 확장.
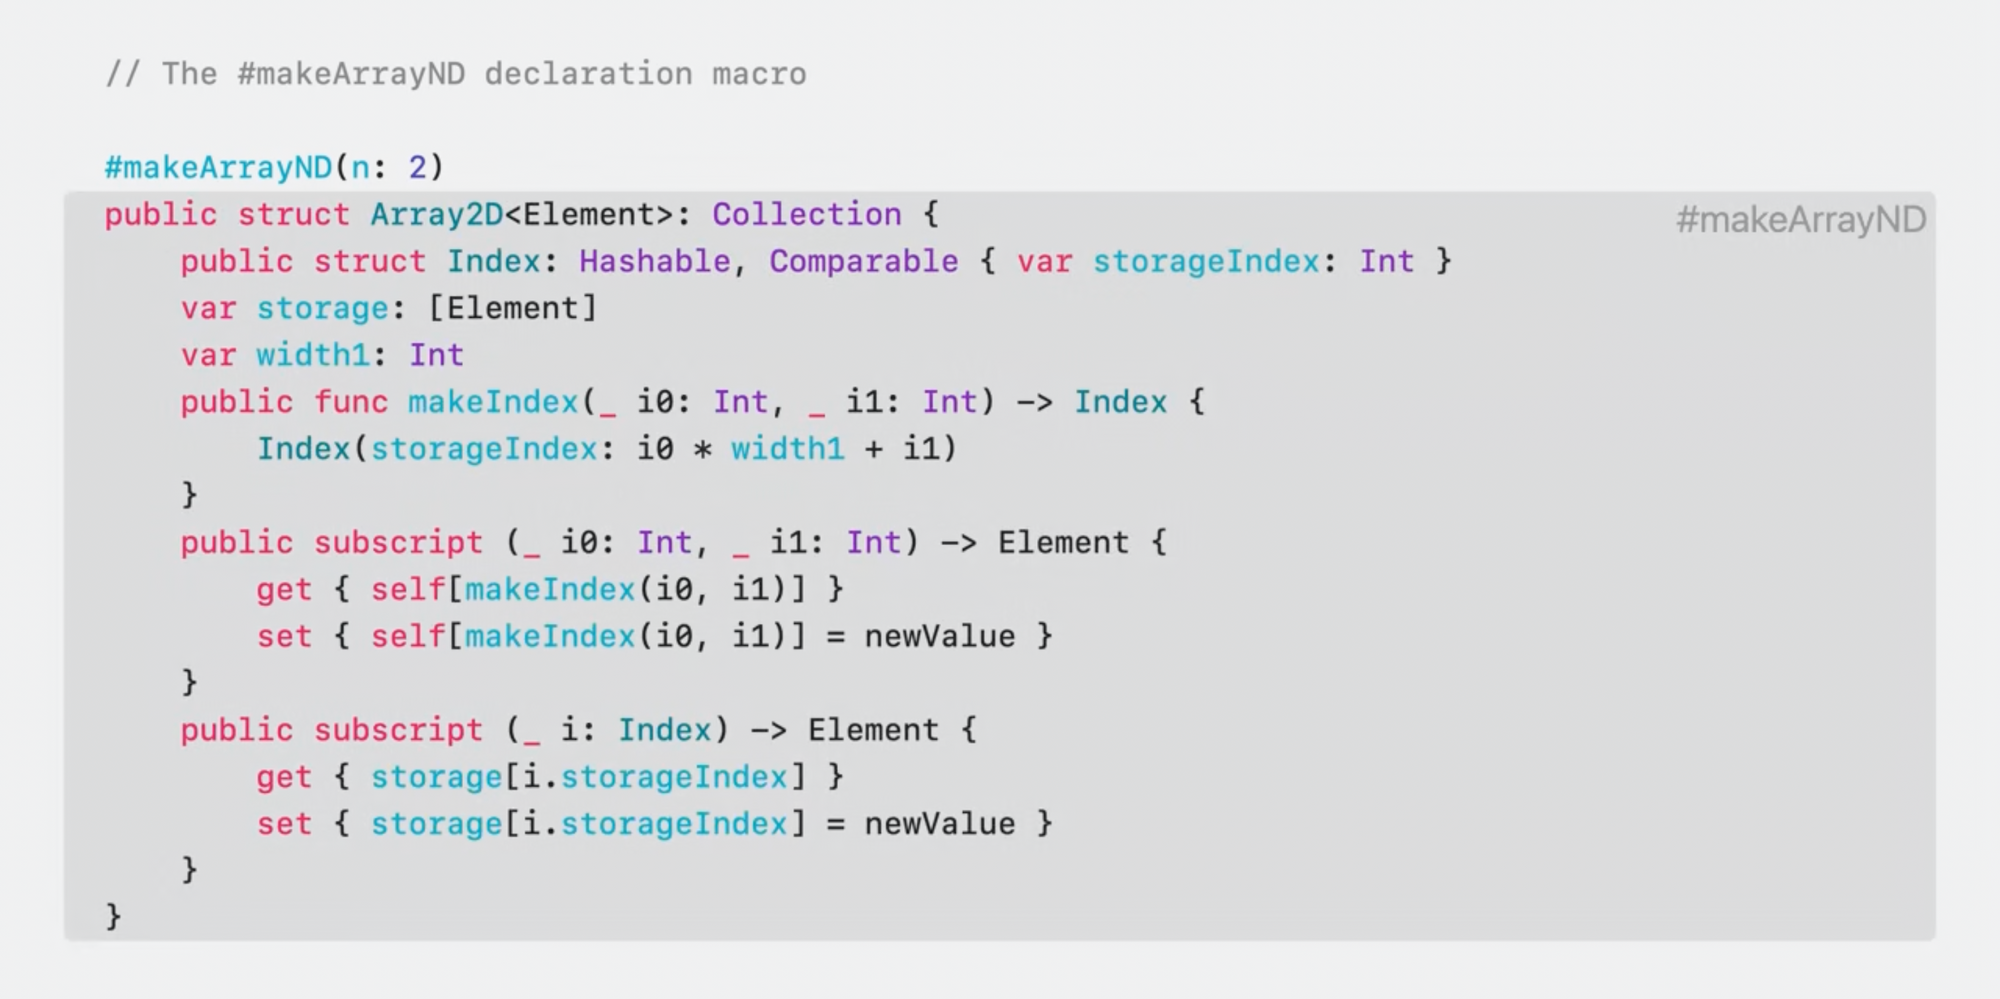
위와 같은 2D배열 type이 필요한 일종의 통계분석을 작성하는 상황을 예시.
배열의 모든 행(rows)이 동일한 수의 열(columns)을 갖기를 원하므로 array-of-arrays를 원하지 않음.
대신 element를 평평한 1차원 배열에 저장한 다음 개발자가 전달한 2차원 인덱스에서 1차원 인덱스를 계산하려고 함.
public struct Array2D<Element>: Collection {
    public struct Index: Hashable, Comparable { var storageIndex: Int }

    var storage: [Element]
    var width1: Int

    public func makeIndex(_ i0: Int, _ i1: Int) -> Index {
        Index(storageIndex: i0 * width1 + i1)
    }

    public subscript (_ i0: Int, _ i1: Int) -> Element {
        get { self[makeIndex(i0, i1)] }
        set { self[makeIndex(i0, i1)] = newValue }
    }

    public subscript (_ i: Index) -> Element {
        get { storage[i.storageIndex] }
        set { storage[i.storageIndex] = newValue }
    }

    // Note: Omitted additional members needed for 'Collection' conformance
}
이를 기존 함수로 작성한 예시.
makeIndex(_:_:)->Index 함수는 2D 인덱스에 필요한 두 개의 Int를 취한 다음 약간의 산술을 수행하여 1D 인덱스로 변환.
그런데 프로그램 다른 곳에서 3D 배열이 필요하다는 것을 할게 되어 아래와 같이 또 추가로 작성.
public struct Array3D<Element>: Collection {
    public struct Index: Hashable, Comparable { var storageIndex: Int }

    var storage: [Element]
    var width1, width2: Int

    public func makeIndex(_ i0: Int, _ i1: Int, _ i2: Int) -> Index {
        Index(storageIndex: (i0 * width1 + i1) * width2 + i2)
    }

    public subscript (_ i0: Int, _ i1: Int, _ i2: Int) -> Element {
        get { self[makeIndex(i0, i1, i2)] }
        set { self[makeIndex(i0, i1, i2)] = newValue }
    }

    public subscript (_ i: Index) -> Element {
        get { storage[i.storageIndex] }
        set { storage[i.storageIndex] = newValue }
    }

    // Note: Omitted additional members needed for 'Collection' conformance
}Array2D보다 인덱스가 좀 더 있고, 좀 더 복잡한 형태. 만약 4D, 5D, … 계속 늘어나게 되면??
이런 각 구조체들은 declaration(선언)이므로 decalaration Macro로 만들 수 있음.
/// Declares an `n`-dimensional array type named `Array<n>D`.
/// - Parameter n: The number of dimensions in the array.
@freestanding(declaration, names: arbitrary)
macro makeArrayND(n: Int)
N차원배열 타입을 생성하기 위한 makeArrayND(n:) 이름의 @freestanding(declaration) Macro를 선언.
차원 수를 n 매개변수로 전달, result 타입을 선언하지 않음. 이 Macro는 다른 코드에서 사용되는 결과를 계산하는 것이 아니라, 프로그램에 선언을 추가하는 것이기 때문.
n을 넣어주는 것에 따라 n차원 배열에 따른 계산해주는 배열 유형으로 확장됨.
@attached
특정 선언에 attach됨 → 작업할 정보가 더 많다는 의미.
@freestanding Macro는 전달된 인수만 제공되지만,
@attached Macro는 연결된 선언에 접근도 가능. 해당 선언을 검사하고 내부에서 이름, 타입, 기타 정보를 꺼내서 사용.
@attached(peer)
변수, 함수, 타입 뿐만 아니라 import 및 operator 선언과 같은 모든 선언에 연결(attached)할 수 있으며 새 선언을 함께 삽입할 수 있음.
→ 메서드, 프로퍼티 에서 사용하면 해당 타입의 멤버가 생성되지만, 최상위 함수나 타입에서 사용하면 새로운 최상위 선언이 생성됨.
사용 예시
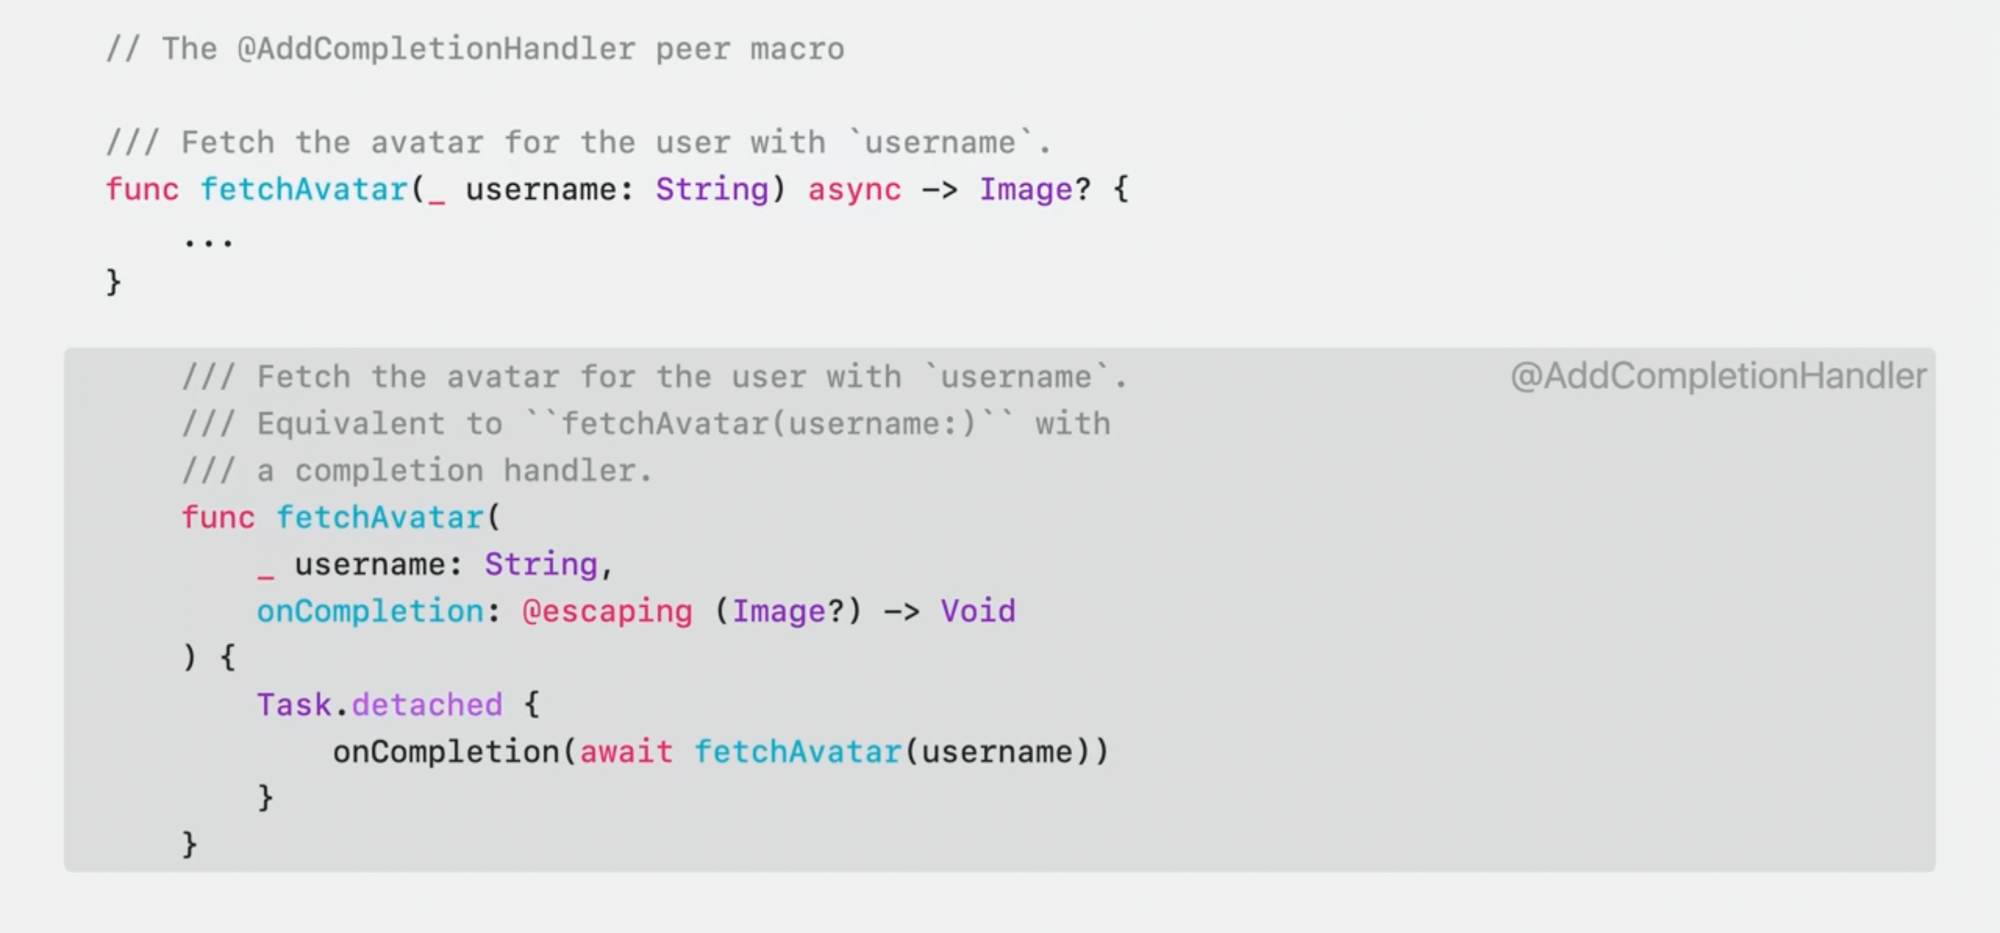
func fetchAvatar(_ username: String) async -> Image? {
    ...
}

func fetchAvatar(_ username: String, onCompletion: @escaping (Image?) -> Void) {
    Task.detached { onCompletion(await fetchAvatar(username)) }
}
Swift Concurrency를 사용하는 라이브러리를 작성하고 있는데, 일부 클라이언트가 여전히 이전 동시성 기술을 사용하고 있음을 알고 있으므로 completeHandler를 사용하는 API버전을 제공하려고 한다고 가정한 예시.
이 작업이 어렵진 않지만, 이런 것이 여러개 있다고 한다면 @attached(peer) Macro로 반복 작업을 줄여줄 수 있음.
/// Overload an `async` function to add a variant that takes a completion handler closure as
/// a parameter.
@attached(peer, names: overloaded)
macro AddCompletionHandler(parameterName: String = "completionHandler")AddCompletionHandler를 선언하고, completeHandler의 parameterName에 대한 매개변수를 지정하고 해당 Macro를 메서드의 async 버전과 attach시킴.
Macro는 원본과 동일한 Completion Handler기반 signature를 생성하고, completion handler에 대한 추가 텍스트가 있는 코멘트 주석을 첨부.
@attached(accessor)
accessor: 접근자
변수, 서브스크립트에 attach될 수 있고
get, set, willSet, didSet과 같은 accessor를 install할 수 있음.
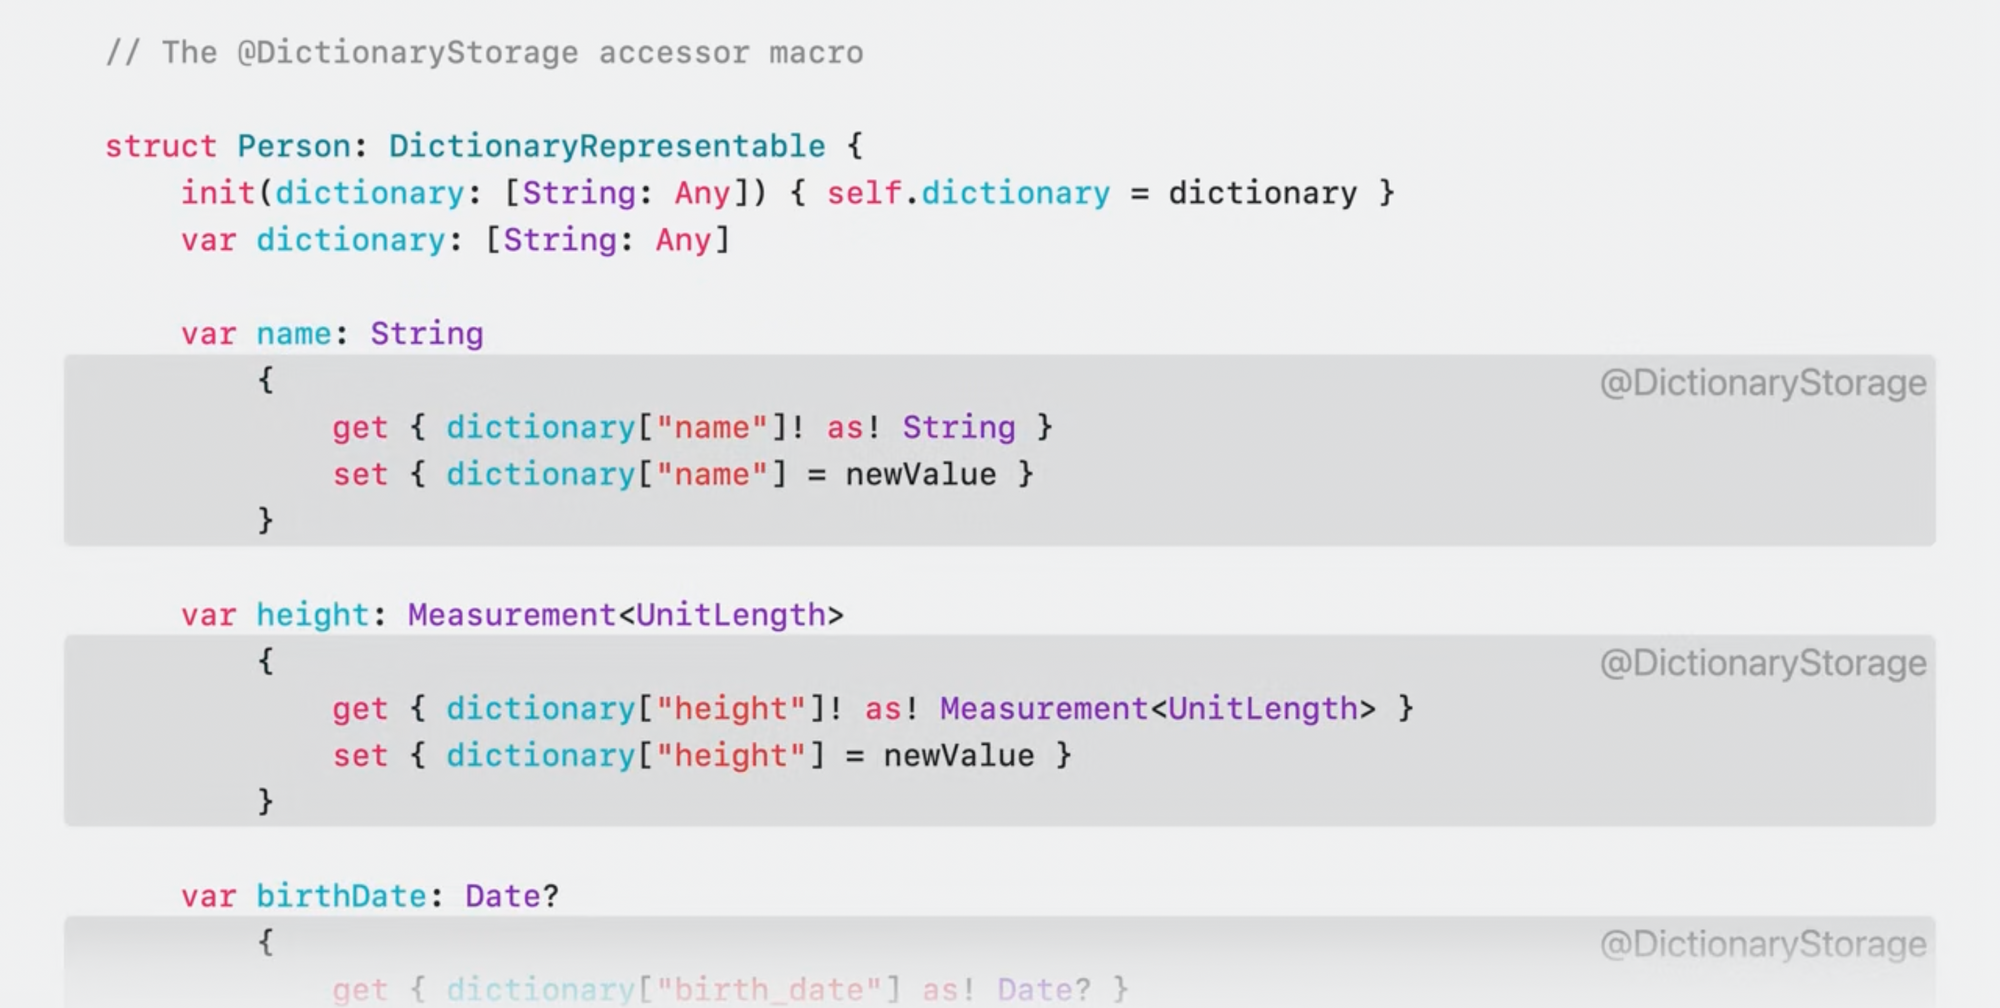
dictionary를 감싸고 프로퍼티를 사용해서 컨텐츠에 접근할 수 있는 여러 타입이 있다고 가정.
struct Person: DictionaryRepresentable {
    init(dictionary: [String: Any]) { self.dictionary = dictionary }
    var dictionary: [String: Any]

    var name: String {
        get { dictionary["name"]! as! String }
        set { dictionary["name"] = newValue }
    }
    var height: Measurement<UnitLength> {
        get { dictionary["height"]! as! Measurement<UnitLength> }
        set { dictionary["height"] = newValue }
    }
    var birthDate: Date? {
        get { dictionary["birth_date"] as! Date? }
        set { dictionary["birth_date"] = newValue as Any? }
    }
}
예시. Person 구조체를 사용하면 name, height, birthData 필드에 접근할 수 있지만 Dictionary에 이 세 개 필드 외에 다른 정보가 있으면 프로그램에서 해당 정보를 preserved하고 무시함.
이 세 가지 프로퍼티에는 계산된 getter 및 setter가 필요하지만 손으로 작성하는 것은 지루하고 프로퍼티래퍼는 함께 사용되는 유형의 다른 저장된 속성에 액세스할 수 없기 때문에 프로퍼티래퍼를 사용할 수 없음.
이를 @attached(accessor) Macro로 해결할 수 있음.
@attached(accessor)
macro DictionaryStorage(key: String? = nil)
DictionaryStorage Macro를 작성. Dictionary에 언더바가 있는 birth_data 철자가 있기 때문에 key 매개변수를 제공하지만 nil로 둘 수 있도록 optional.
struct Person: DictionaryRepresentable {
    init(dictionary: [String: Any]) { self.dictionary = dictionary }
    var dictionary: [String: Any]

    @DictionaryStorage var name: String
    @DictionaryStorage var height: Measurement<UnitLength>
    @DictionaryStorage(key: "birth_date") var birthDate: Date?
}
이렇게 각 프로퍼티 앞에 작성해주면 Macro가 알아서 접근자를 생성.
위처럼 개선이 되었지만 여전히 boilerplate 코드가 있음. 일부 built-in attribute를 전체 타입 혹은 확장에 적용해서 이런 종류의 상황을 처리할 수 있음
→ @attached(memberAttribute) 로 처리
@attached(memberAttribute)
타입이나 extension에 attach되며 attach된 모든 멤버에 attribute를 추가할 수 있음.
/// Adds accessors to get and set the value of the specified property in a dictionary
/// property called `storage`.
@attached(memberAttribute)
@attached(accessor)
macro DictionaryStorage(key: String? = nil)
이번에는 새 Macro를 선언하는 대신 이미 가지고 있는 @attached(accessor) Role과 함께, DictionaryStorage Macro에 다른 Role attribute를 추가.
→ Role Composition: Swift가 어떤 Role을 사용해야 할지 모르는 곳이 있기 때문에 (2가지 freestanding을 제외하고) 모두 Role을 조합해서 composition할 수 있음.
@DictionaryStorage를
- 타입에 붙이면 멤버 attribute Role을 확장.
- 프로퍼티에 붙이면 accessor Role을 확장.
- 함수에 붙이면 DictionaryStorage에 함수를 attach할 수 있는 Role이 없기 때문에 컴파일 에러가 발생.
@DictionaryStorage
struct Person: DictionaryRepresentable {
    init(dictionary: [String: Any]) { self.dictionary = dictionary }
    var dictionary: [String: Any]

    var name: String
    var height: Measurement<UnitLength>

    @DictionaryStorage(key: "birth_date") var birthDate: Date?
}
이 두번째 Role을 DictionaryStorage에 추가하면 모든 프로퍼티에 별도로 attach하는 대신 전체 타입에 attach할 수 있게 됨.
Macro는 이니셜라이저, Dictionary 프로퍼티, 이미 DictionaryStorage attribute인 birth_date 프로퍼티 같은 특정 멤버를 건너뛰는 로직이 있음.
그 외의 저장 프로퍼티에 DictionaryStorage attribute를 추가하고 위처럼 확장됨.
여기서 이니셜라이저와 저장 프로퍼티를 더 개선할 수 있음.
DictionaryRepresentable 프로토콜에서 이 개선이 필요하고, 프로퍼티는 accessor에 의해 사용되지만 DictionaryStorage를 사용하는 모든 타입에서 동일함. DictionaryStorage가 이들을 자동으로 추가하도록 만들 수 있음.
→ @attached(member)
@attached(member)
memberAttribute Macro와 마찬가지로, 타입 및 extension에 사용할 수 있지만 기존 멤버에 attribute를 추가하는 대신
완전히 새로운 멤버를 추가할 수 있음. 메서드, 프로퍼티, 이니셜라이저 등 추가 가능.
클래스, 구조체에 저장 프로퍼티를 추가하거나 열거형에 case도 추가 가능.
/// Adds accessors to get and set the value of the specified property in a dictionary
/// property called `storage`.
@attached(member, names: named(dictionary), named(init(dictionary:)))
@attached(memberAttribute)
@attached(accessor)
macro DictionaryStorage(key: String? = nil)DictionaryStorage에 @attached(member) Role을 추가해서 기존 Role들과 Composition.
이 Role은 이니셜라이저와 dictionary라는 프로퍼티를 추가시킴.
두 개의 서로 다른 Macro가 동일한 코드에 적용될 때 어느 것이 먼저 확장될지? → 별로 중요하지 않음.
각각은 다른 것에서 제공한 확장없이 선언의 원래 버전을 볼 수 있음. 따라서 순서를 걱정할 필요가 없음.
컴파일러가 언제 Macro를 확장하든 상관없이 동일한 내용을 볼 수 있음.
@DictionaryStorage struct Person: DictionaryRepresentable {
    var name: String
    var height: Measurement<UnitLength>

    @DictionaryStorage(key: "birth_date") var birthDate: Date?
}
@attached(member) Role이 추가되었기 때문에 더 이상 두 멤버를 작성할 필요조차 없게 됨.
이제 @DictionaryStorage를 작성만 하면
- 이니셜라이저와 dictionary 멤버를 추가시키고,
- 프로퍼티들에 DictionaryStorage attribute를 추가시키고,
- 해당 프로퍼티들이 accessor로 확장됨.
하지만 아직 DictionaryRepresentable 프로토콜에 대한 적합성에 대한 boilerplate가 남아 있음.
→ @attached(conformance) Role로 이를 처리
@attached(conformance)
타입이나 extension에 적합성을 추가시킬 수 있음.
/// Adds accessors to get and set the value of the specified property in a dictionary
/// property called `storage`.
@attached(conformance)
@attached(member, names: named(dictionary), named(init(dictionary:)))
@attached(memberAttribute)
@attached(accessor)
macro DictionaryStorage(key: String? = nil)
DictionaryStorage Macro에 @attached(conformance) Role을 추가해서 기존 3가지 Role과 composition.
@DictionaryStorage struct Person { // DictionaryRepresentable 프로토콜 제거
    var name: String
    var height: Measurement<UnitLength>
    @DictionaryStorage(key: "birth_date") var birthDate: Date?
}
이제 수동으로 적합성을 작성할 필요가 없게 됨.
accessor와 생성된 멤버에 대해 이미 추가한 DictionaryStorage attribute는 이제 이미 수행되고 있던 다른 모든 작업들과 함께 적합성을 자동으로 추가시킴.